Gildoran
-
Posts
2393 -
Joined
-
Last visited
Everything posted by Gildoran
-
@UnskilledLaboror: I think you're misunderstanding what people are calling "oppressive religiopolitical organisations". They're not refering voluntary religions, but rather theocracies. Also, you seem to have religion and "being kind to one another" confused. If being nice to people was all religious organizations ever expected of people, few would feel oppressed by them. Many religions throughout the world have a long history of trying to silence opposing views (consider Galileo), even torture and murder those who hold them. (for example, the inquisition) Even now, though religions have grown far more pleasant, they still seek to impose restrictions on people, having nothing to do with promoting "being kind to one another". For example the recent bans on same-sex marriages. What does that have to do with "being kind to one another"? Not too long ago it was even illegal in many parts of the US to work on Sunday. What does that have to do with "being kind to one another"? It's imposition of your religion upon others. How would you feel if many people in the US were Jewish and there were laws prohibiting pork? It's this sort of stuff that many people take offense to, not being asked to be kind and charitable. It always baffles me when I see Christains assume that Athiests must be mean people who like to kick puppies and such, just because they don't worry about Heaven and Hell or read the Bible. Athiests don't need a fear of God to be nice to others - they do it out of the goodness of their hearts. And only a sociopath cannot tell the difference beween right and wrong without the aid of a book.
-
Ok, I've added this to the wiki.
-
Ok, I've come up with a variation of this method that allows you to scale the intensity of the detail texture, but it requires two passes and an inverted detail texture. (though most would probably look just fine without being inverted) { blend gl_zero, gl_one_minus_src_color map your/detail/texture rgb detailAlpha scale 2, 2 // or whatever } { blend gl_dst_color, gl_one map _white rgb detailAlpha/(2-detailAlpha) } In the above example, replace detailAlpha with whatever you're using to determine detail intensity. (for example, parm3 might be good, as would a constant)
-
Yeah... I got the idea as a way to simplify the blending used in the TDM main menu's background (it consists of two separate passes; one to modulate and one to scale), which was intended to look similar to "soft light" blending in image editing programs.
-
I think I've found a good way of doing detail textures... it has the advantage over regular modulation that it usually keeps the average color of the texture the same, whereas modulation must darken the average color. (this means you could turn the detail passes off for distant entities to save on fill-rate, and the player wouldn't notice a change in their brightness) The disadvantage is that the intensity of the detail depends on the detail texture, and can't be scaled by the material. The way it works is as follows: Create a greyscale detail texture with an average color of 50%. Parts of the detail texture that have middle-grey will keep the material the same color. Darker parts of the image will darken the material, lighter parts of the image will lighten it. Add the following render pass at the end of your material shader: { blend gl_dst_color, gl_src_color map your/detail/texture scale 4, 4 // or however much you want.. you can also rotate it } You can add as many detail passes as you like, but keep in mind they use fill-rate.
-
Ok, just checking. For wall_brick_broken, I think it would be better not to include the branch or vegetation... Having the branch makes it harder for mappers to repeat the texture unnoticably, and prevents them from using it in sewers, which I think they'd be perfect for. Also, the normalmaps for the branch/grass look odd to me; there appears to be a ridge to the left of the branch in this picture:

-
(I figured I'd ask this here rather than respond with a PM, since I can post images that way) For stonewall_natural_6, I think the high contrast of the "texture" of the normalmap makes it difficult to comprehend the texture. Here's an example of what I mean: Notice that it's actually easier to tell where the stones are in this post's thumbnail than in the full-screen image. The normalmap's texture overwhelms its general geometry, making the image look flat and difficult to understand. Could you smooth out and/or decrease the contrast of the texture of the normalmap, but leave the constrast of its general geometry the same (or maybe even increase it)? For stonewall_crumbling, is the normalmap intentionally flipped for the bricks towards the top?

-
Thanks for the new versions of many diffuse/normalmaps! I'll list things as I add them: (btw, these look great!) stonewall_7 added as masonry_001 stonewall_natural_2 added as masonry_002 stonewall_natural_3 added as masonry_003 stonewall_natural_9 added as masonry_old_001 wall_brick_broken_2 added as brick_old_001 (I wasn't sure about this or the next one, because of how the white plaque only appeared on the tops of bricks, making it look like a highlight ... fortunately, your normalmaps saved the day and made it look like plaque ) wall_brick_broken_3 added as brick_old_002 stonewall_crumbling added as masonry_old_002 stonewall_crumbling_2 added as masonry_old_003 stonewall_natural_6 added as masonry_old_004 wall_brick_broken added as brick_old_003 stonewall_natural_4 added as masonry_old_005 stonewall_natural_8 added as masonry_004 I've updated wall_bumpy's diffusemap (on CVS it's called rounded_001) to use the new one you've created.
-
Have at thee!
-
Is that a threat, you frivolous bourgeois?! You gonna bonk us with your bottle rockets? On this side of the ocean we shoot like soldiers, so don't make promises your missles can't keep!
-
Later this weekend, I'll probably try setting up a testmap showing what a specular-based window looks like, so people can decide if that's even desirable... (the window screenshot above showed such a window)
-
Ok, I've been trying out a few different ways of doing specular-based windows, and each has advantages/disadvantages... The basic idea is to have at least two textures that work together: a texture that receives normal light, acting as the frame and window, and a texture that receives a second spectrum of light, acting as the light that shines through the window. Note that these experiments are for the kind of glass that the player would be nearby... I'd also make a kind of glass that's easy to place and cheap to render, but it's not covered here. Method 1: Separate frame and window textures. This method uses 3 textures all placed in the same spot. (depth-fighting isn't an issue because their brushes are the exact same size/position) A texture showing only the wood frame. A texture showing only the glass, in a normal spectrum. (so if a player shines a light at it, it shines back) A texture showing only the glass, in a special specturm. (so the mapper can control how the window is lit) This method has a couple of advantages: the glass and frame are kept separate, allowing the mapper to easily mix-and-match glass and window frames, and the transition between frame and window has an anti-aliased appearance. The disadvantage is that the window is twice as expensive to render (with regard to fill-rate) so it would be very important to keep the number of lights hitting the window very low. (the reason I don't consider it 3-times as expensive to render is because I assume the third texture will only be hit by one light) I should mention that as a convenience to mappers, I believe it would be possible to set things up so that a single material contains render passes for textures 1 and 2, allowing the mapper to only place two brushes per window, instead of 3. In an attempt to decrease fill-rate usage, I tried to resize things so that the frame and window were kept somewhat separate, with overlap only at the boundary between frame and window. Unfortunately, since the brushes were merely coplanar, rather than having the exact same size/position, z-fighting occured. Method 2: Combined frame and window textures. This method uses 2 textures placed at the same spot. (depth-fighting isn't an issue because their brushes are the exact same size/position) A texture showing the wood frame and the normal-spectrum glass. A texture showing only the glass, in a special spectrum. (so the mapper can control how the window is lit) This method has the advantage that it's not much more expensive than a normal texture, but it has a severe disadvantage: Since the normalmap for the frame and window are combined onto a single texture, they interfere with eachother in all but the first mip-map level. Thus as the player gets farther away from the window, ugly graphical glitches start showing up on the glass near the frame. Method 3: Using an alphatest frame This method is similar to Method 1, except the frame is alphatested and its brush is placed slightly in front of the glass. This allows the engine to avoid rendering the frame's lighting in places that contain only glass and vice versa; in other words, this method isn't much more expensive than a normal texture. Unfortunately the boundary between glass and frame is aliased. For thick wooden frames, the aliasing isn't noticable, but for thin wire frames it can be severe.
-
Ha ha ha ha! Your Government, an angel? You're lucky the global mercenary corps aren't bashing down its door for stealing their clientele. Why just the other night, I saw it out back, blowing up the middle east!
-
Heh, I only recognized it because I've used the windows ping in songs too.
-
Yeah, I think so... I just worry that if I put it there, it'll end up getting lost. Maybe I should put it on the wiki?
-
Any idea where the best spot to place this post would be? Do most texture contributers have any access to the texture forums?
-
Edit: Moved to the DarkWiki.
-
Is that the windows ping sound I'm hearing in the musicbox version? Really though, it sounds great.
-
In Orcarina of Time, every "secret cave" was exactly identical. It took away the fun of exploration when you already knew what the cave was going to look like.
-
I really enjoyed LoZ: A Link to the Past and LoZ: Link's Awakening, but I was really turned off to the series by LoZ: Orcarina of Time, because it used prefab cookie-cutter caves for the secrets. (in contrast LoZ:ALttP felt like it had infinite secrets, each special and unique) Have they fixed that in later Zelda games or do they still have any cloned areas?
-
The way I'm intending to do lights is to have a couple of different source textures: one of the frame and glass (the part due to glare from indoor lighting), and one just of the glass (to simulate light coming through from the other side) From those, you could construct different textures to meet differing needs: A nice looking glass using specular to simulate light from the other side. (about as expensive as a blendable texture) A cheap glass using additive blending whose color is controlled by vertex parms, or has a couple of preset colors. (useful for when you don't have extra fill-rate to spare, or you don't want to place light entities to color it. I'm not sure wether or not I'll do the whole ambients shining through the glass thing; it has the disadvantage that I can't do specular, which causes the glass to not look as good. In any case, before I make that decission, I'll set up a testmap on CVS.
-
Ok, I'll try changing the color of the wood some, perhaps add a bit of noise. The actual color of the glass is controlled by a light. (which allows the bright spot to change via specularmaps, as though you had a pointlight light behind the glass)
-
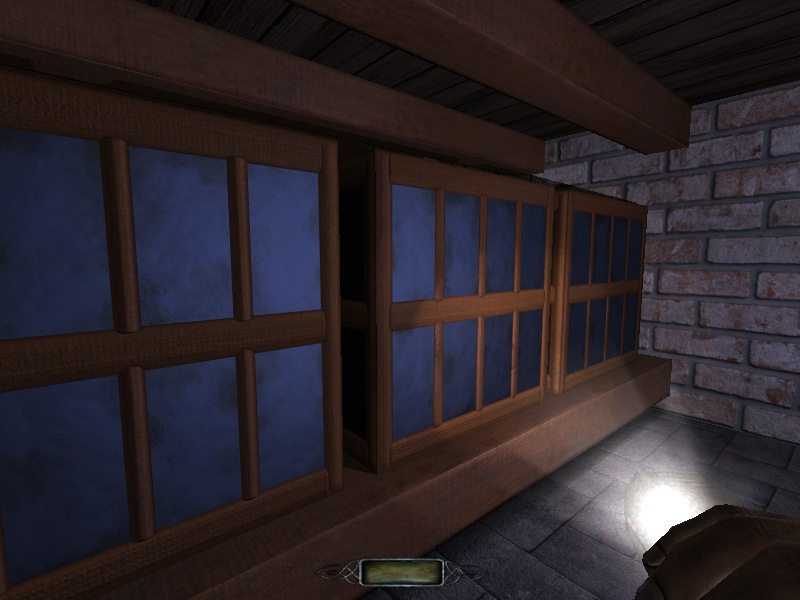
Ok, I've gotten some basic glass working. It still looks a bit "gamey" to me, despite the dirt... Any ideas for how to improve it?
-
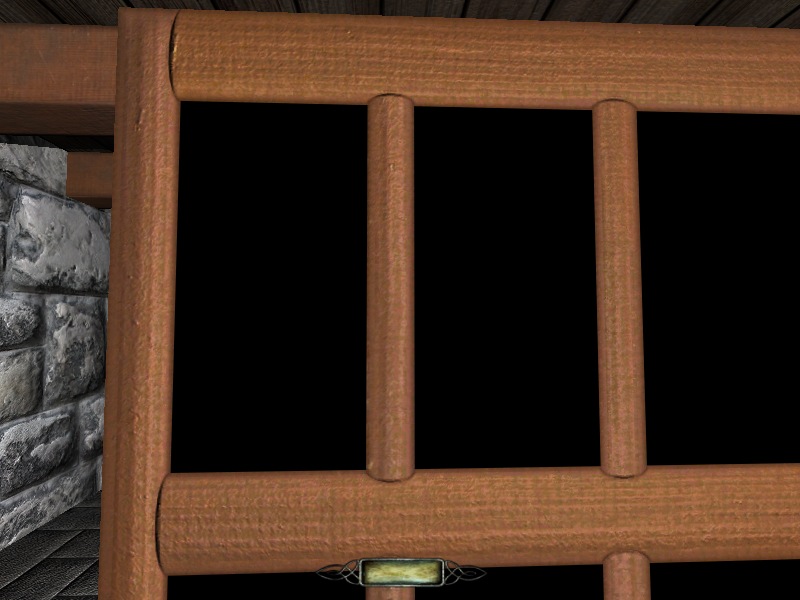
Ok... using another image of the same beams, I've started work on making a window frame for use in some window texture testmaps I'm going to be making. Here's a shot of the detail: I don't think it looks quite as realistic as the beams, but I'm still pretty happy with it. Any suggestions for how to do glass/dirt? Do I need to look for source images of dirt or is there a way of generating it?