

Maximius
-
Posts
1231 -
Joined
-
Last visited
Posts posted by Maximius
-
-
Heres another try at the longsword:
http://img266.imageshack.us/img266/4598/bi...ongswordib2.jpg
http://img165.imageshack.us/img165/605/lon...tcloseuput5.jpg
Im not in love with the blade as it is, I want to fine tune the curve of its edges. Total polys is like 270 so there is plenty of room for detailing and such.
-
I'll take it if you don't want it and sell it on Ebay ! Maybe you should find it's rightful owner. What is address on package? Maybe he/she give reward or you get karma points like Fallout. I say you should!
Thats the weird thing, neighbor lady said it was in the mail pile but there is no address on the box now that I look at it, so it could not have been from the mailman. And the box was not sealed either, just a cardboard tab tucked in. I wonder who dumped it into our mailslot? Someone returned it to the wrong house.
It has SATA connections in the back actually, they look exactly like this picture:
http://img338.imageshack.us/img338/9794/satapic1la2.jpg
That is SATA right? My computer has the IDE ribbons or whatever, would it be possible to purchase a SATA cable setup and install it? I could use a ton of new memory right now, in fact I can't even install D3 at this point I have so much crap on my HD.
-
Never heard of 'em before.
Google turned up their website - have you tried poking around there?
Yes, it appears to be a kind of portable, secure hard drive that you can unlock and pull out of your computer.
I have a metal box with a kind of hard drive in it, but I dont have the frame it fits into which in turn fits into your computer case. The ports in the back of the hard drive wont accept the standard IDE or whatever cable that HDs take.
-
The mailman left a package in our box the other day and the neighbor lady gave it to me, assuming it was mine. Its a CRU Dataport, which looks to be some sort of portable harddrive. Is this correct? How can I hook this thing up to something?
-
This is all making sense guys. We'll have to talk more about shadow and collision meshes and all that jive. It would seem that in a castle setting there would be a need for two models of the same sword, hi poly ones for guards and matching but simpler models for an armory weapons rack.
I'm reworking the sword and Im going to try a battle hammer and axe as well, I found a webpage that has clear photos of the real things. Results soon!
-
The more familiar certain aspects of the world are, the more fantastic the other parts of the world will seem. And that's all to the good. Therefore it makes sense to keep the mundane aspects (like calendars) the same as our world. See Harry Potter, for example. HP's setting wouldn't be nearly so interesting if there wasn't a non-magic world sitting beside the magic one.
And that's even without getting into immersion, which I believe is enhanced by the fact that you don't need to pay attention to boring things like calendars. After all, if you want to make the argument that it's not immersive to have our calendar in their world, then logically it must be even less immersive to use the same language! Therefore I propose that we create a new language, Darkmodese, which we shall use throughout the game world, and which everyone must learn before they can play it.
What's that? You don't want to have to spend 6 months studying a language before you get to play the game? BAH! Lazy players, grumble grumble...

I always thought the mix of the familiar and the weird or anachronistic in the Precursor games added a great deal of flavor. One (probably more) old FM had a kind of Mechanist mining operation that had broken into an ancient tomb or something. The mix of undead and mining equiptment, crude electric lights and woo, had a great deal of impact. It made the setting impossible to really pin down in terms of origins, enhancing the immersion because it could not be criticized as being too much this or that, it was a mix, and it gelled nicely with the magical/technical world of the games. I usually despise attempts to weld magic and sci fi into one setting, except Lovecraft of course, who could crap on my kitchen floor and I'd thank him heartily.
-
I think your modeling work is coming along, but you should definitely start using photoreferences for your work. The proportions on the sword do not look very believable, and that can ruin the whole effect. The grip is quite thin, there doesn't appear to be much of a pommel and the crossguard sticks out way too much for a sword with a handle of that length.
Compare yours with our longsword model:
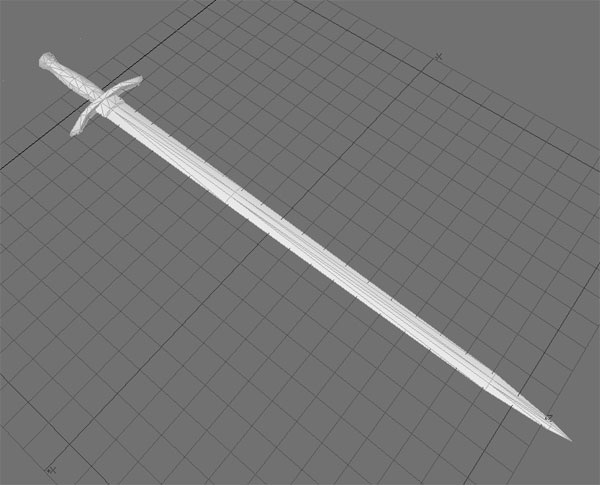
You also don't have to be quite so stingy with polys. Our longsword is about 325.
Find a picture of a sword that you like and start stretching and resizing things to look more like it, and you'll find it starts making a huge improvement.
Thank you Springheel, I appreciate your points. A question: Why does the sword get a higher poly allowance, is it because its an item the player will encounter often and in clear view, while other items, say the cleaver I made, would generally get at best a cursory view and most of the time only a quick glance?
-
Heres the sword:
http://img383.imageshack.us/img383/1685/sw...ighrangelw6.jpg
http://img383.imageshack.us/img383/904/swo...tcloseupca4.jpg
Its only about 108 polys and I could reduce it more but I wanted it a little fancy for right now.
Im looking into a normal map plugin for LW8, when I get that set up Ill get the cleaver and block texturing started.
-
The last song "Cold and Blue" really kicked ass NH. Great response from the crowd too!
-
What do you mean double sided blade? like a standard sword with 2 edges? or using a 'double' sided texture?
Two edged sword, not the texture. Here is the chopping block for the cleaver, Ill put the two together tomorrow. The table is 66 polys.
http://img262.imageshack.us/img262/9433/ch...ocktableyl7.jpg
-
they look good. Texture that cleaver already would ya?

I just wanted to show off the tang against the handle.
 Seriously, that should be an easy tex start. You could use the anvil metal as a diffuse, might want to make your own normal though. Could use white 0.35 as specular (see materials, that's just a guess on specular value)
The anvil diffuse is big enough you could place the blade so none of the rusty stuff appears.
There are basic wood materials too that you could use for the handle (I've used em for several things like broom handle and coatrack). you'd probably only want to use about an 8th of the wood tex so the handle would use about the same amount of pixels as everything else.
Ok, I will reread my notes and try to whip up some maps, give me a bit to refresh myself on that stuff. I have to get going with GIMP again but that won't take too long to pick back up. If you don't mind, Ill post my questions here as I go for you to assist. Im trying to make a sword right now for the heck of it, having a bit of trouble getting the double sided blade to look right though.
-
Here is a redesigned cup, but its a bit hefty at around 126 polys, 26 of which are in the handle:
http://aycu09.webshots.com/image/23048/200...26973499_rs.jpg
And here is a pretty nifty cleaver, I dare say:
http://aycu02.webshots.com/image/22561/200...58264223_rs.jpg
Note the full metal tang, one of the marks of a quality knife:
http://aycu07.webshots.com/image/24046/200...08818708_rs.jpg
Cleaver totals only around 32 or 36 polys, Ill make a chopping block table for it too. Thanks for the link Crispy, I've been reading it through a bit and its helpful.
-
New style on this cup eh?
I was going for minimal polys, I could add a cut at the base to give it more of a bowl appearance and less of a sherbertbut it will add 12 polys I think.
I wouldn't worry too much about actually attaching the handle. No reason to increase polys just so it is 'welded' to rest of cup. Once exported they will be one piece anyway, they will not detach.I've heard it called 'floating polys'. The handle can just float there and be fine.
p would run a booleen function on all intersecting polys. Sometimes doubling polys, sometimes worse.
So then it was back to building correctly again. No floating. As soon as I got back into that habit I started doing models for Darkmod, now I am back to floating polys again.

That blows my mind. When I started modeling I had assumed that everything had to be welded together or somehow joined, knowing this opens up a lot of avenues. This is a cardinal example of a tiny bit of information that holds up a noob for no reason other than no one has yet to think to mention it because its so trivial. This is why an extended conversation amongst beginners would advance the general cause: beginners questions come up all the time and the easy problems can get sorted out sooner versus later.
-
No prob, the plug for reducing polys is probably Optimize
It can come in handy sometimes, but usually best to build optimized, same as adding polys. Try and build the final product the first time without too many poly tweaks and it'll be best for you in the long run. You'll get exactly what you want, not what the 3d program wants to give you.
Here is an 8 sided version and a 12 sided version. The 12 is 74 polys minus the handle, the 8 is 72 with the handle, and the handle itself is 24 which will become 26 or 28 when I cut it again to bend it properly where the lower section of it joins the cup. I may be able to reduce its poly count a bit by simplifying it. The handle is not attached yet, Im trying to figure out the best approach to that. The way I have tried increases the poly count by like 2 or 4 or something, I split one of the cups big polys foursquare and now Im trying to weld points from the handle to points on the cups side. Unsuccessful so far though.
http://img406.imageshack.us/img406/2379/pu...v28sideslv9.jpg
http://img509.imageshack.us/img509/562/pun...212sidestz3.jpg
Optimization from the ground up certainly makes sense. Ill look into that plugin too. Give me a day or so and Ill have that cleaver I mentioned too, or at least a version.
-
Ok Im remaking the cup with 12, flat top. I find out about the light smoothing as well. I know that LW has a plug in too that reduces polys for you so I'll see if I can hunt that down for what its worth.
Thanks for explaining with your trophy, it makes it instantly understandable what light smoothing versus poly smoothing is.
-
Those look pretty cool. I like the punchbowl and ladle set together.
(are they going to be glass?)
Thanks, but there is a problem. Everything but the cup smooths nicely. Around the cups handle though are a bunch of polys that wont smooth until I Triple them, breaking them up into triangular parts, and then they smooth but they look crappy.
http://img413.imageshack.us/img413/853/cup...gproblemtg5.jpg
Here it is unsmoothed with the handles adjusted.
http://img442.imageshack.us/img442/8113/cup2iy9.jpg
If all 3 are going to be glass you could basically cylindrical map the cup/bowl and scoop of ladle and use same maps.The handle of ladle and cup could both share a planar map even if they each only use half of it. Or each it's own, combining em would keep the overall number of maps down (easier to organize, not necessairly a file size thing)
Sometimes I'll cylindrical map and item like this, but if I want the tex to cover each side I'll go into uvw edit and drag all faces on top of each other. That way you can have a more detailed pattern on each of the 8 sides instead of a less detailed wrapped all the way around.
Or you could delete one half of bowl, uv map the saved half, then clone/mirror and reattach to saved half, so the tex would tile twice, once on each side of bowl.
I'm doing this with a crown right now.
This is where we are going to have to take some baby steps, I've drawn some normal maps before but I have never been able to apply them. Lets come back to this in a short bit.
The polycounts are good. Depends what your ultimate goal is. We had a discussion in another thread about this. 8 sides will never look round, you need at least 10 sides, maybe 12.Of course the style of this set could be octagonal which I think looks fine. In that case 8 sides works just fine.
I had thought that it was best to use multiples of 8 in LightWave but maybe thats not correct. I did want to make it glass so I think it would work in this instance.
I think we can create several skins for it. I also like the ladle and the bowl.
Glad you like them spar. While Im trying to map them, Im also messing about with trying to make a set of kitchen knives, starting with a nice cleaver and chopping block set.
-
Thats a great looking trophy. I really like the delicate looking handles. Here is the punchbowl set in the nude, I got the cup handles by extruding one poly and welding it to another after bending it out around and back again. It could be straightened a bit but it looks decent I think. The bowl is 66 polys, the ladle 94, and the cup 112 or something like that.
http://img443.imageshack.us/img443/6073/punchbowlset1ke3.jpg
http://img119.imageshack.us/img119/5995/punchcup1kx6.jpg
http://img239.imageshack.us/img239/2296/punchladle1uu5.jpg
Edit: Crap I just realized I forgot to crop those jpegs. I think they are big enough though to get the general drift.
-
@ Maximus, well, we probably have a slightly different perspective on newbs helping each other. When I started modelling I didn't know anyone personally who was doing anything, and it seemed like anyone online who helped new tons more than I did. I did have a roomie at the time that did a tiny little bit, but mostly he was just stoked to see what I was doing and watch my progress.
But I do understand that it could be a help and if you've got people around it helps just to feed off of each other if nothing else. That in itself can get alot done.
There definitely seems to be an information gap between the skilled and unskilled when it comes to amateur modeling. Sometimes I have questions that are so basic, so simple, that its nearly impossible to figure out even with the help of the experienced. I could not figure out how to send objects from the modeler to the layout in LW for like nearly a month, I was missing one tiny step which the people assisting me probably didn't even bother to ask because it was so elementary. Also, I am an educator, so I value the classroom dynamic and the "synergy" that develops between students. I think it could be valuable here, with a crowd that is obviously bubbling with creative juices.
For that weird poly problem, hard to tell without a pic, but it sounds like you need to turn an edge. I'm not sure how that's accomplished in Lightwave but I'm sure someone here does, or there is a tut somewhere.Another way would be to delete those two polys and recreate them so the edge between is how you want it.
A rough example here
|\| = bad alignment on edge angle, doesn't allow the polys to arch the correct way around a shape.
|/| = good alignment. This edge has been 'turned'
I hope that's what you mean, post a pic if not though, well get that ladel game ready.
I will look into that, I usually just remake the object to get them out, but it would save time learning to how to correct it I think.
Normal maps- everything looks better with them for sure. They just add shadows and hilights for polys that aren't really there. Thus making a simple model look complex.You can reuse existing normal maps to to avoid bloating the mod, or combine several jars into on tex.
You could use the goblet tex on a bottle, or just use the goblet normals with a different diffuse.
Some of this is too hard to type out and be understandable without pics.
Maybe if you've got something like that ladel that you want to get a complete run through I can help you out and show you some possiblities along the way, then the next obj you could mess around with on your own until you hit a prob.
Thats grand, again you guys consistently rock. I will probably just remake the whole thing and get it right the first time, but I still have some questions especially about joining the cups handles into the bowls after I extrude them. Ill post some pics here later. Then I have to figure out about drawing maps for the bowl, Ill have to review my notes from before. I have a few ideas about how I would like to texture it.
One point about normal maps that Baddcog forgot to mention: all materials in Doom 3 must have a normal map--if it doesn't, D3 will generate a flat normal map for it. The only reason not to use a normal map for an object is for space considerations.Thats interesting, I did not know that and thought that normals were useful but not the standard.
-
@Maximus,
Not to disuade you but I would focus more on a few quailty objects. Especially working on mapping of them.
Generic slapped on textures work OK sometimes. An example would be the vases, they have 5 textures 3 of don't really excite me at all. They look pretty generic, just quickly made color variations.
I'm really only saying this from experience. I've been doing T2 stuff along time, when I started doing Darkmod stuff it took at least a month of pretty solid work just to tweak myself into the darkmod way of modelling.
I'm more than willing to help out with any of these problems you may run into.
Then I think after you have gone through the whole process a few times and understand it fairly well, that would be a good time to help someone else learn it.
Thanks for putting these things into perspective Badcog, its easy to get a bit overwrought when you have finally got a few things made and you are feeling feisty. I know these items are not game ready, I just wanted to show them off and get some feedback on them at this point.
I got a reality check last night with this punch bowl ladle, the poly on the back by where the handle leaves the bowl claims it has more than four sides and will only triple, at an odd angle, which looks crappy when I smooth it. I can't get the damned thing to look right. Its always amazing how I can move along at a relatively decent clip and then some simple thing tangles up for a whole night or more.
I have done a little normalmapping work with Gildoran before, I understand the basic ideas I think. But I had not thought that a normal map would be used on something like those perfume bottles honestly, not that they couldn't but I thought normals were for either really simple stuff like making square pipes look round or for really detailed stuff to accentuate fine details. Are most objects normal mapped? Simple things like bottles or cups too? Im sure in some instances, some unique object like a holy chalice or something.
Thank you for your offer of assistance, its great how you guys are willing to help noobs along.
 I will be pestering you shortly. But I still think that there would be value in the noobs talking amongst themselves, much as students in a classroom benefit from discussing problems in addition to learning from the instructor. And while Wikis and tutorials and such are very helpful, even an uninformed partner is better at helping you solve problems at times. You can't ask a Wiki or a tutorial a question, you can only get the information it presents. Sometimes thats not whats happening in LightWave and you are totally stymied because the tutorial says its going to do X but it did Y, or nothing happened, or funny black polygons appeared.
 -
Sounds like the way that multibrushes work in Dromed, right?
That does sound interesting, in that you could set up all sorts of stock object combinations good for using in rooms, houses, inns, pubs, etc, quick but good-looking filler, esp good for side-rooms that are peripheral to the game, you just want to stock without spending too much thought ... Or for that matter, good for quickly putting together entire buildings and maybe even collections of buildings, like off in the distance. And then you can always tweak it to taste after you've placed it. That is a good idea. Anyway, it doesn't take anything away from letting a builder do what he wants with the objects ... just a gratuitous but potentially nice convenience in some situations.
It's also great for things that are a pain to set up manually, like doors.If five beginner modelers could be assembled, we could agree to create these sets and they would add up pretty quickly. Say we all decide to make punch bowl sets, something I started last night. So I make my "archetype", then make five to ten variations on it. It took me an hour to make the bowl and most of the ladle, a cup that can be cloned six times will be for tonight. Now, tomorrow I can tweak it and make three different versions, probably in 1/2 hour, a few more the next night, lets say for a total of six. Just different textures and shapes, a few minutes with the modeler and its done.
With my colleagues, we would have a set of 30 to chose from in a week, actually much less if necessary. Then, the next week, its dining ware, then silverware, soon you have a pile of dining stuff. Then its kitchen stuff, then bedroom stuff. The reason to work on the same stuff is so that if problems crop up, all the noobs are roughly on the same project and can benefit instantly from advice from the more skilled and each others input. Plus all the numerical and aesthetic standards would be in accordance, with one person pointing out things to another to keep everyone moving in the same direction. I'd be happy to get a IM prog and help a noob to get started. After that we are both fucked.
I have some time and sanity finally. Im getting paid leave from work so I can breathe for the first time in about nine months instead worrying about becoming homeless. It would be easier for me to stay on this schedule but its not really that onerous, cause after the first model is made its all tweaking. If anyone is interested in working on sets of items please PM me and we'll get going. If you can contribute one hour a night, and less on some nights cause once you get going some stuff is really easy to reproduce, you could help build up this repository of objects.
-
I mean a mapping prefab if you didn't get me. Which means that the models are individual, you just insert a copy and pasted DarkRadiant map into the map you're working on.
So then you'd have individual models, and flexibility, but for the lazy person you could import this tray.
The prefab tray would be lots of models, so the physics would work as normal. It's just a way of storing positioning.
I think I understand you better now, you copy and paste a mini-map of the objects into the larger map? So the prefab tray would not be a solid object but a pre-arranged set of individual objects that you could select from? Thats an interesting idea, it seems that it would be possible to assemble a library of related objects, lets say perfume bottles, all associated with a set of trays and accompanying objects.
-
You could have a prefab tray perhaps? With the models set up on the tray, prefabs are small I think, like tiny maps.
Thats right I think but these guys are pointing out that prefabs have drawbacks too. It seems best to go with individual items. If there is a variety, and with simple stuff it should not be too hard to produce, you could quickly assemble a relatively original scene. Enough to help immerse you in the story or setting.
In fact, other than time and effort Im not aware of a reason why this level of work couldn't be done to order. I know thats a bold statement for a total frikking noob to modeling but its true. All those perfume bottles could be altered in a moment, all those makeup jars, it would be simple. A specialized design or scheme could be incorporated pretty much at whim. A mapper could ask for the same brush/comb set done in ivory or wood or whatever and it would take a few seconds of reassigning textures. Add a bit of variety to the brush/comb base set and you have quite a bit of diversity available, and so on.
-
I use Azureus which is pretty good. Do you want to run it on Windows?
I did try Azureus but found it a little confusing, there was some security plugin I was supposed to install but Im not sure if I did correctly. Yes its for Windows
Use utorrent. There's nothing tricky to set up, just install it, though make sure you limit the upload speed to something like half of your capacity.It's not a system hog like most other clients.
Ill chek it out thanks guys.
-
Im trying to get into using some sort of torrent download thingy, can anyone get me started? Whats a good program, and are there any good websites that walk you through? I found a few to read but I get lost real fast when they start talking about assigning ports and stuff like that.
What a CRU Dataport?
in Off-Topic
Posted
No I actually have a hard drive here, its the security frame thats missing. I have to figure out how to attach these SATA cables to my computer. I wonder it they are compatible?
Remember guys, I live in Philadelphia, when someone wants you dead a fifteen year old rides up on a scooter and blows your head off. No one "bombs" people here anymore, sheesh, how passe'.