
kyyrma
-
Posts
289 -
Joined
-
Last visited
-
Days Won
13
Posts posted by kyyrma
-
-
I tried to make sure all the material used is CC0, so no credit necessary, but I will do a double check in case you want to add this to the core.
-
Wow that's really awesome how easy it seems to make a nice ambient track now - especially after listening to the great demo songs you've put up here!

On a sidenode, this link doesn't work:
2. Copy that over to a new track three times and then close the remaining bell sound track. The result should look somewhat like this picture.
Thanks, glad to hear it! I'm still very much learning myself, so I'm hoping I can make the guide a bit more clearer in the future
I fixed the link, thanks for pointing that out.
-
 1
1
-
-
I guess they could be compiled into packages, sorta' what I was looking to do with extra SFX.
Also, here is something I just made. Now this is basically nothing but a stretched out sound texture, very slight variation in pitch for a duration of a few minutes.
-
Thanks for the feedback guys, I'm getting there - slowly!

I'll keep working on it, hopefully I'll hit the sweet spot soon.
-
Is this closer to what you are looking for Biker? I've been listening to T1&2 ambients and tried to do something more in that style.
-
- Popular Post
- Popular Post
Having spent some time fiddling around with the audio side of mapping, I decided to compile a few sounds into a single package that can be used by other mappers. The amount of sound effects supplied with TDM is already very good, but a bit more variety can never hurt right?
These sound effects are edited from original recordings or Creative Commons 0 material and are free to use in any way you like.
Here you can see the full list of contents:
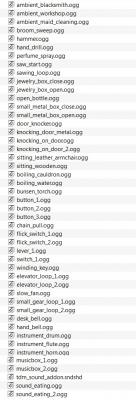
To use these, simply download the sound add-on package and extract it into your root TDM folder. The files come with correct folder structure and a pre-made soundshader file. Keep in mind that if you use these in your FM you need to supply the files you have used and the .sndshd file alongside your mission - otherwise the players will not be able to hear the sounds.
I'm hoping to compile a second batch of SFX somewhere down to road, so if anyone has requests or feels that specific areas of TDM sound effects are lacking, post in this thread and I'll see what I can do.
-
19
-
Glad to hear that the guide has been of help. Report back here if it helps you get any results!
@Buck28: Sorry about that. That line was a placeholder where I was going to link a guide to creating a soundshader, but I couldn't find one for the life of me. Fixed now.
-
- Popular Post
- Popular Post
Composing Ambient Tracks for Dummies
v. 1.0 or How I Learned to Stop Worrying and Make the Ambient
This tutorial shows you my method for creating ambient sound without any previous musical talent or experience in using audio editors required. The guide will be fleshed out as I learn more about the process and everyone is welcome to contribute. Feel free to add your own comments and suggestions in the thread.
These are type of ambient tracks that have been created with my methods:
What tools do you need?
- Audacity (Free: Win/Mac/Linux)
- Freesound.org (Either sign up for a free account or get one here)
- A good pair of headphones
- 4-6 hours of free time
For best results follow the tutorial twice: once following my directions exactly with the samples I provide, and then a second time picking your own samples and making your own choices in how to modify them.
With these simple tools and a bit of patience you too can produce your own ambient track with relative ease. Just don't expect to become Eric Brosius overnight. Remember to save your project between between sections, and don't worry about completing everything in day.
I. Planning and preparation
Once you have Audacity set up on your plaftorm of choice, create or choose a directory where you store all the different audio samples we will be using in this guide.
To make sure your headphones are set up correctly, change the volume of your operating system to a comfortable level. Next try playing a familiar song at 50% of the max volume in your music player of choice. The sound should not be too loud or quiet, but right in the middle. Otherwise adjust the operating system as necessary and repeat the test.
When starting to compose an ambient piece, it helps to have a certain theme or setting already in mind. For the purposes of this tutorial we will be creating a track that plays in an outdoors cemetary area with a horror theme.
II. Choosing the ambient base
For our base ambient we want to pick a long recording that also has some melody or variance to it. This means that it is not just one long flat note, but that there is some variance in pitch and progression in the recording. For our tutorial we are creating audio for an outdoors area, so a recording of the wind howling could be a good starting point.
1. Go to Freesound.org
2. Use the search on the right hand side to look for "wind howling"
3. Filter the search results by Creative Commons 0 license: this means you are free to use the audio however you please
4. Listen to the different samples available to you
5. Download a sample of your liking into whichever folder you want to store your samples in
For our cemetary example I picked the following recording of an electric pole under stress from the wind.
6. Add the sample to your Audacity project by simply dragging and dropping the file into your open Audacity window
Now is a good time to get comfortable with the basic controls of Audacity. In the top-left of the window you see the playback controls. You can use that at any time to play and preview the audio you are working on. Try playing a part of the sample you just downloaded.
III. Effects in Audacity
Before we start applying effects to our base ambient track, let's take a quick look at the tools at our disposal. All the effects are found under the Effects menu in the top bar of Audacity.
- Fade in / Fade out: Used to smooth the transition to and from a sound effect. Use these to avoid clicks or sudden spikes when layering audio samples on top of each other.
- Echo: Exactly what it says on the tin - adds an echo effect with your specified delay.
- Noise Removal: Used to remove noise from low-quality recordings, but can be used to achieve all sorts of effects. Select an element you would like removed from the track by highlighting it in the track. Now open Noise Removal and choose "Get noise profile." Next highlight the part of the track you want that element to be removed from and execute the effect. Experimenting with this effect can produce interesting changes in your audio tracks.
- Repeat: Can be used to loop a highlighted part of the track multiple times.
- Change Tempo / Speed / Pitch: These three effects are your main tools in modifying the audio samples. Change Pitch adjusts the frequency of the audio: usually ambients tend to be in the lower frequencies. Change Tempo changes the speed of the audio without affecting the pitch. To adjust the speed and the pitch at the same time, use Change Speed instead.
- Paulstretch: Stretches out the highlighted piece of audio. You can produce very cool ambient sound by stretching short pieces of audio. Try stretching something like a piano key strike or a single string of the violin to 10-20 seconds.
- Reverb: Produces a similar but much more subtle effect to echo by simulating how sound traverses in a closed space. Gives your audio more oomph and makes it more organic sounding, which is a must for a good ambient track. You might want to apply this effect to specific tracks or after the whole project has been put to together depending on the samples you are using.
- Reverse: This flips the audio temporally. Many common everyday sounds produce interesting results when played in reverse. Try things like creaking doors, musical instruments and even spoken word.
- Amplify: Used to make a sound louder or more quiet.
IV. Applying effects on a track
The sample we picked for the purposes of this tutorial is somewhat high-pitched, so let's go ahead and lower its frequency a bit.
1. Double-click on your track in Audacity to highlight it.
To use effects in Audacity you always need to have a part of the audio highlighted, otherwise the effect will be applied to all active tracks in the window. I will not repeat this step again in the instructions, so try to keep it in mind.
2. Open Effects > Change Pitch and apply a -80 percent reduction in pitch (the last input box in the Change Pitch dialog)
Notice how different the track sounds now? Instead of the earlier high pitched wind and screaming of metal we are left with a much more subtle hum.
You can always revert the track by pressing Ctrl + Z to undo your last change. Go ahead and try out the Change Pitch effect with different values to get a feel for how pitch affects the audio track. Just make sure you move on to the next step with just a single -80 percent reduction in pitch as instructed.
The tempo of is still a bit too fast for our haunting cemetary theme, so let's slow it down a bit.
4. Open Effects > Change Speed and apply a -35 percent reduction in speed
The track should now sound significantly slower then before. Just like in the last step, you can undo the change and try out different Change Speed values to get a sense of how the effect modifies the track. Just make sure you move on to the next section with just a single -35 percent reduction.
V. Trimming, copying & pasting
With all the slowing down our base ambient track has gotten way too long. The average ambient loop can be as long as just a minute, but naturally a longer track is less prone to being repeative.
1. To trim down your track, highlight about a minute worth of audio from the beginning and use Ctrl + X to cut it out.
2. Next click in empty space in the window to deselect everything and then use Ctrl + V to paste the audio on its own track.
3. You can now close the leftovers of the original audio track by pressing the small X in the top left.
At this point it would be a good idea to save your work. Go to File > Save Project and save your work so far.
VI. Layering
The trick to a good ambient is in layering a different audio tracks together. We have our base ambient ready, but lets go ahead and add another layer of audio on top of it.
1. Download a sample and drag and drop it into your project
For our haunted cemetary ambient I picked a sample of rustling an empty garbage bag that turned up as I search for "rustling" on Freesound.org. If this is your first time going through the tutorial, you might want to use the same sample as I did - otherwise feel free to find your own.
Note that when you drop the new track in Audacity, the level of zoom might change. Use Ctrl + Mousewheel up and down to adjust the zoom level.
2. Mute the main ambient track so we can focus on editing the new track
You can find the mute control on the left-hand side of each track. The mute button allows you to individually mute any track which will come in handy when previewing different combinations or working on a single track.
3. Use Effects > Change Speed and stretch the rustling sample to roughly the same length as the base ambient track
If your base ambient track is about one minute in length, a reduction of -80 percent in speed should be about right. Now the resulting audio would be perfect for a rockslide! That doesn't exactly fit with our haunted theme however, so let's go ahead and modify the sound further
4. Use Effects > Change Pitch and lower the frequency by -60 percent
The resulting audio should now sound more akin to a thunderstorm. This could work well for a rainy level, but for now let's go ahead and apply another effect.
5. Use Effects > Paulstretch and apply the effect with a Stretch Factor of 1 and Time Resolution of 2
In addition to stretching sound (the sound is stretched to the power of the Stretch Factor) the Paulstretch effect can be used to smear tracks by using a high Time Resolution with a Stretch Factor of 1. The resulting audio is now a smooth but rather loud monsoon type of wind.
At this point we should try and listen to the two tracks layered together.
6. Unmute the main ambient track and play the project.
You should instantly notice that the track we have modified from the rustling garbage bag sound is now overpowering the main ambient. This is where the individual volume sliders come handy: you can use the volume slider on the left-hand side of each track to change its volume.
7. Adjust the volume of the second track until it doesn't overpower the main ambient (the track is very loud, so up to -30dB)
VII. Adding Instruments
By instruments I mean shorter samples that are used to give the ambient track structure. In general you want to avoid making an ambient track too rhytmic or melodic, as that will easily make it sound repeative. Yet we still need to break up the monotony of the final track somehow and give it depth.
For the purpose of our haunted cemetary I picked a recording of a power tool cutting metal that I found when looking for a violin sound - a good reminder on how a variety of everyday sounds can be modified into interesting ambient sound texture.
Let's go ahead and start modifying our power tool track into screams of the haunted:
1. Add the sample to your project and mute the two previous tracks
2. Use Effects > Paulstretch on the track with a Stretch Factor of 2 and Time Resolution of 0.25
The stretched out track sounds more like shrieking mandrakes then the type of howl I had in mind, but let's go on ahead and cut a few good shrieks out from there.
3. Highlight and use Ctrl + X and Ctrl + V to place a total of three individual shrieks on their own track, and then close the remaining power tool track. This is what the result should look like.
4. Slow down the shrieks by individually applying Change Speed on all of them: highlight a single shriek and then change the speed by -30 to -50 percent.
5. Make the shrieks into a low howling by individually applying Change Pitch on all of them: highlight a single shriek and then change the pitch by -80 to -90 percent.
6. Give the (now) howls an individual volume by using Effects > Amplify and changing the volume by +-5dB
Amplify can be used to both make a sound louder or more quiet.
Giving each shriek it's individual values will make them stand out from each other and give your track variety. Next we will need to find out how they sound with the other two tracks.
6. Unmute the two previous tracks and listen to the whole project layered.
The first thing you will hear is that the howling track is too loud, so go ahead and reduce the volume of the track by 25dB or so. Even then the howls don't seem to mesh too well with the two other tracks, so let's address that next.
VIII. Adding Fade-ins and Fade-outs
Fade-ins and Fade-outs can be used to smoothen samples that are played on top of the ambient tracks.
1. On the howl track, highlight half of a single howl from the left side and then use Effects > Fadein.
2. For the same howl, highlight the right half and use Effects > Fade out.
3. Repeat the same process for the two remaining howls.
The howls should now mesh with the other audio much better, but let's keep on layering more sounds on top.
IX. Adding Instruments pt. 2
While the howls break up the monotony of our track somewhat, the project still feels flat. It needs a bit of melody and high pitched samples to break to give it more structure. To fit our haunted cemetary theme, I picked a recording of bells being rang. Go ahead and drop that into your project in Audacity and mute the rest of the tracks as before.
This recording has an amplifying bell sound, so it's not exactly suited for our to-be looping ambient. Let's cut a piece from it to use in our project instead.
1. Use Ctrl + X to cut out two consecutive bell strikes from the beginning of the track.
2. Copy that over to a new track three times and then close the remaining bell sound track. The result should look somewhat like this picture.
Try to place your bell strikes so that they fill empty gaps in the project. Remember that you have to keep adjusting the placement of the strikes as you apply different effects on them. You can use instruments to create different rythms, sequences and melodies into your ambient tracks.
3. Now let's modify the bell sounds using a combination of the tools you have learned so far:
- Paulstretch the sounds with a Stretch Factor of 2 and Time Resolution of the default 0.25
- Slow the speed of each two strikes by 40 to 50 percent
- Give each two strikes a slightly adjusted frequency
- Add fade-ins and fade-outs to each two strikes
To add even more layering to our ambient, let's create one more bell track from the one we have now:
4. Create a copy of the bell sounds track
5. Slow down the copied track by 50 percent
6. Adjust the hits on the slowed track so that they fit into the length of the base ambient
This is what your final project in Audacity should look like. At this point your project is almost done, go ahead and save it in a safe place.
X. Mixing, Looping and Exporting
Now it's time to finalize your project!
1. Adjust the volume of each track
For the final mixing you want to go and adjust the volume on each and every track one more time, making sure you get the volumes just right. Once you are satisfied with how the project sounds, let's go ahead and mix it together.
2. Press Ctrl + A to select all tracks and then use Tracks > Mix and Render to compile them all into a single track
3. Use Effects > Reverb to add a reverb effect on your track
Reverb will add a bit more oomph and organical sound to your track.
Looping
This simple but effective method is from Goldwell
1. Highlight about 5 seconds from the beginning of the track and use Effects > Fade in
2. Highlight about 5 seconds from the end of the track and use Effects > Fade out
3. Cut the last 5 seconds of the ambient and paste them on their own track
4. Use Tracks > Mix and render to put the song back together
Your track should now be looping!
Exporting
The final thing left to do is exporting your project. Use File > Export to save your ambient track as an .ogg.
Here is the track I made while writing this guide: Haunted Ground
If you want to use the track in TDM, you still need to create a soundshader for it. Follow this guide on how to create a soundshader.
-
13
-
I'm working on writing a description of my workflow in Audacity.
I only have so much time to work on this, so I decided to dump a rough draft here. Once it's finished I'll make it a separate thread, but maybe Sotha can get something out from this already:
Composing Ambient Sound for Dummies
v. 0.1 - A Wall of Text for Sotha Edition
This guide describes my method for creating ambient sound without any prior musical or audio knowledge. It will be fleshed out as I learn more about the process - feel free to add your own comments and suggestions in the thread.
What tools do you need to create an ambient?
- Audacity (Free: Win/Mac/Linux)
- Freesound.org (Requires free sign-up)
- A good pair of headphones
- 2-3 hours of free time
This tutorial assumes that you have at least some prior knowledge of Audacity.
With these simple tools and a bit of patience you too can produce a piece of ambient audio with relative ease. Just don't expect to become Eric Brosius overnight.
Gathering samples
The first part of your process is deciding what type of sound you want to make. Do you want something completely abstract or maybe slightly rhytmic? Will the sound be used indoors or outdoors? What type of space and mood is it supposed to convey?
For the purpose of this tutorial, let's pick the following keywords and themes:
- Cemetary
- Outdoors
- Horror
Once we have our preliminary themes set, let's get started on picking our samples. The samples you will be using belong roughly to two categories: Longer samples, that will be used to create the main ambient, and shorter samples that will be layered on top to stop the ambient from becoming too monotonous.
Let's choose a longer sample for the base ambient first. As we are talking about an outdoors area, a recording of the wind howling seems like a good starting point.
Go to freesound.org and search for "wind howl" - after you've searched for the keyword, make sure you filter the results by the "Creative Commons 0" license by using the menu on the right hand side. This means you are free to do whatever you wish with the audio files without any copyright issues.
Now listen to some of the samples available to you. For your base ambient you want to pick a recording that has some melody or variance to it: changes in pitch and frequency will keep your ambient from becoming just a single flat note.
For our cemetary example I picked the following recording of an electric pole under stress from the wind. Let's add that sound to our project: Simply drag and drop the file into your open Audacity window, and the audio clip will be opened into your project. Once we have our first audio track in place, it's time to start experimenting how we can create an ambient out of it.
Adding effects
Audacity has a handful of simple but powerful effects that can be used to create more abstract ambient audio from your sample. Here is a short run-through of the most imporant ones found in the Effects drop-down menu on the top bar:
- Fade in / Fade out: Used to smooth the transition to and from a sound effect. Use these to avoid clicks or sudden spikes when layering audio samples on top of each other.
- Echo: Exactly what it says on the tin - adds an echo effect with your specified delay.
- Noise Removal: Used to remove noise from low-quality recordings, but can be used to achieve all sorts of effects. Select an element you'd like removed from the track by highlighting it in Audacity, open Noise Removal and choose "Get noise profile." Next highlight the part of the track you want that element to be removed from and execute the effect. Experimenting with this effect can produce interesting changes in your audio tracks.
- Repeat: Can be used to loop a highlighted part of the track multiple times.
- Change Tempo / Speed / Pitch: These three effects are your main tools in modifying the audio samples. Change Pitch adjusts the frequency of the audio: usually ambients tend to be in the lower frequencies. Change Tempo changes the speed of the audio without affecting the pitch. To adjust the speed and the pitch at the same time, use Change Speed
- Paulstretch: Stretches out the highlighted piece of audio. You can produce very cool ambient sound by stretching short pieces of audio. Try stretching something like a piano key strike or a single string of the violin to 10-20 seconds.
- Reverb: Produces a similar but much more subtle effect to echo by simulating how sound traverses in a closed space. Gives your audio more oomph and makes it more organic sounding, which is a must for a good ambient track. You might want to apply this effect to specific tracks or after the whole project has been put to together depending on the samples you are using.
- Reverse: This flips the audio temporally. A lot of common everyday sounds are produce interesting results when played in reverse. Try things like creaking doors, musical instruments and even spoken words.
- Amplify: Used to make a sound louder or more quiet.
The audio track we have selected for this tutorial is very high pitched, so let's start by lowering the frequency. Choose the Change Pitch effect and try out different values. For the purposes of this tutorial I settled on lowering the frequency by -80 percent: at that point the audio becomes a much more subtle hum.
There are still some remains of high pitched howls in the background however, which make the audio sound almost a bit driving. We could choose to go with the flow and enhance that with something like samples of a violin, but for now let's try to eliminate the urgency. Our aim is to create a haunting piece after all. Use the Change Speed effect and try out different values. I found that at minus 35 percent speed the track starts to sound like the sort of creepy ambient we are looking for.
At this point our audio file has become unnecesarrily long. Let's cut it down to roughly a minute or a bit more. You can save the audio you have made so far before trimming it, so that you can fall back to this point later if something gets mucked up. Next we will start layering audio on top of the main ambient.
Layering
The trick to a good ambient is creating layers of sound with different audio samples on top of the main ambient that makes up the background of the track. Let's go back to freesound.org and look for some more audio that might fit our horror cemetary theme - maybe a rustling sound to tense the nerves?
Searching for "rustling" on freesound.org I picked the following sample of rustling an empty garbage bag. Doesn't sound like much, right? Not yet anyway. Let's add that to our project as well by dragging and dropping it into the Audacity window: the new track should show up right below our main ambient.
You can mute and enable each track individually by using the small button on the left-hand side. Let's mute the main ambient for now so we can concentrate on our new rustling track. After you have muted the main track, double click on the rustling track to fully highlight it and use the Change Speed effect again to stretch it out to roughly match your main ambient track.
For me a 80 percent reduction in speed was enough. The resulting track is now more akin to a small landslide than the rustling of an empty garbage bag, but the audio still needs some work. Lets use the Change Pitch effect to lower the frequency of the sound. At minus 60 percent frequency the track starts to sound like a proper thunderstorm.
Thunder is not what we are after this time though, so lets use another trick on it. The Paulstretch effect can be used to "smear" an audio track by using a large timescale with a stretch factor of 1. Let's smear the rustling track by using a timescale of 2. The resulting audio should sound like wind humming in the background. Now would be a good time to listen to both of our audio tracks layered: unmute the base ambient track and listen to your creation.
You'll notice that the humming wind we created is overpowering our base ambient a bit: you can adjust it by using the volume slider of each track near the mute button. Try lowering the audio of the humming track until the sounds layer nicely: lowering the humming track by about 10dB seems to do the trick. Once we have the two tracks layered nicely, we could search for some more tracks to layer on top or we could start to break up the monotony of the track by adding shorter samples.
Adding instrument samples
By instrument samples I mean shorter samples that are used to give the ambient track structure. In general you want to avoid making the track too rhytmic or melodic, as that will easily make the ambient sound repeative. Still we want to break up the monotony somehow. Think of these samples as instruments played on top of your ambient track, like tiny guitar solos of despair.
For our cemetary track I'd like some screams of the damned to amplify the horror element. For that a corruption of many different instruments will do, but for this tutorial I wanted to go with a violin. Searching for a good violin sound I stumbled upon a sample of cutting metal and decided to use that instead.
To get out the screams we want lets add the sample to our project and use Paulstretch to stretch it out. This time let's use the default timescale of 0.25 and a stretch factor of about 4 or so. Now the track should be full of unholy howling, but it's a bit too high pitched. We don't want the players to have their ears bleed, so let's cut down on the frequency by at least 80 percent.
The result should be a track full of much more mellow crying demons. Next we cut a few pieces from the track: isolate a few good howls and use Ctrl + X and Ctrl + V to place them on a new separate track. Move the howls around and try to line them up with the other tracks so that they are at parts where the other ambient tracks change from one tone to another, or where there is drop in volume. Try different positions and play all the tracks together and adjust the volume so that the howls are not too in your face: a reduction of about 15dB on the howls seems right.
While the howls break up some of the monotony, they don't yet mesh too well with the other audio. Lets go ahead and stretch each howl out a bit, but instead of Paulstretch let's use the Change Speed effect: a reduction of about 50 percent makes the howls sound like the Octobrains in Duke Nukem - sweet! I slowed each howl down with a different percentage to make sure the sound are varied. Note that once you slow the howls down, you need to re-align them on the timeline.
Now each howl has a bit more sustain, so we can add fade-ins and fade-outs to make the transitions more smooth. Highlight both tails of each howl and apply the right effect. You can experiment with different lengths of fade-in and fade-out.
Our track finally starts to have some structure, the fact that it is made up of only lower frequency sounds makes it sound muddled. Let's add some higher notes by using a bell sound - that fits well with our cemetary theme. The bell sound I used can be found here.
The bell track I used has an increasing volume towards the end, so instead of using the whole track I just cut two bell strikes from the beginning. After that I used some of the same effects we have been using previously to distort the sound to my liking. I then copied the sound a few times to create a track where the distorted bell sound is repeated. I then created a copy of the bell track and slowed it down using Change Speed to create a second layer of bell sounds.
After that I went through the process of adjusting the volume of each track until I found what I felt was the perfect mix.
This is what the final result looks like in Audacity. (Note that yours will not probably look exactly alike, it's cool!)
To finalize my track I used the Tracks > Mix and render to compile all my tracks into one and applied the Reverb effect on the compiled track to give it some more oomph. The last thing left is to give your track a cool name.
This is what the final result sounds like. Not that bad for roughly an hour worth of work, right?
- Audacity (Free: Win/Mac/Linux)
-
@Goldwell: Thanks man! Great job.
This one should loop straight out from the box.
Nope, it doesn't. Oh well!
-
I'll try to make it loop a bit more nicely. I already tried to make it so it would loop, but as you can hear my lack of skill is showing
If anyone has experience in making a song loop, feel free to give a hand.I can try making something for the commoners and nobles too.
-
I likes! Hey, how did you do that? Howsabout writing a small tutorial so that others could try as well?
I always wanted to do my own ambients, but I just cannot get anything done. It is like I'm missing some sort of brain area for it or something...

Thanks! It's nothing but sound effects distorted and layered on top of each other: a few random piano hits, a sample of a woman singing opera, opening and closing a wooden drawer and clicking a ball-point pen. I got the samples from freesound.org and used the free Audacity software to put it all together.
I'm completely tone-deaf as well. But after mucking around in Audacity for two nights, I'm now pretty confident that anyone can create a custom ambient given a bit of time and patience.
Writing a tutorial sounds like a good idea, I'll get to it as soon as I have a bit more time in my hands.
-
Here is something I attempted. Keep in mind I have zero experience with creating ambients or music of any kind.
-
I've compiled some CC resources including SFX for mapping, I'll rummage through them later this evening and post relevant stuff here.
-
Thats bloody awesome dude, is that stone texture a mix of two stock textures? as its very good.
Thanks! The cliff face is a large patch with the jagged_rock texture and another patch with ivy_bush_hanging stacked on top.
It doesn't look quite as good from other angles, because I just wanted to try and copy that photo in TDM
-
-
Thanks guys! Glad to hear you enjoyed it.
This was so well executed it's impossible to believe it was a speed build.While it only took two weeks, it was a very intensive two weeks. I happened to have a week off and Airship simply never sleeps, so were able to put a lot of work down each day.
Hopefully other mappers will pick up on the idea as well. While I love nothing better then a large, meaty FM, having smaller missions to supplement them would be lovely. The long "dry stretches" between large FMs can be hard on more impatient players like myself!
is INTENSE! I had headphones on and wow.I was really worried we would get the volume wrong, and someone playing with headphones would break an eardrum...
 I hope it was not too loud!
 -
Alright, here you go. This is a super simple way to make an AI follow you on command with zero scripting required.
Download follow_test.map (save this in your darkmod/maps folder, dmap and play normally)
This is how it works:
The bell item targets a trigger_relay, which triggers the bell_sound attached to the player as well as the start_conversation node (atdm:target_startconversation).
The start_conversation triggers a conversation called Follow Player that you can view through Map > Conversations... in the Dark Radiant menu.
In the conversation I've set Orton, our poor hapless servant, as the only active actor and given him the following orders:
1. Say a line
2. Walk to the player (player1 entity)
3. Say a line
Now every time you ring the bell, that conversation is triggered and Orton will walk to you. To prevent him from wandering back to his starting spot once he reaches you, I've added an unreachable path_corner in a separate room that he is targetting.
-
3
-
-
I've been playing Dark Mod with a controller for a while now using a program called Pinnacle Game Profiler. Absolutely amazing piece of software if you want to use a controller in games that don't natively support it.
If anyone is interested, I could share my configuration for TDM.
-
2
-
-
I can also look into this at some point. I've been thinking of doing something similar for a map anyways, so I'll get back to you if I manage to rig a simple way of doing the AI follow stuff you need. That way you (or anyone else) can use it as an example.
-
Can path_corners be created during gameplay through scripts?
For a simple follow-AI (for example someone being escorted) you could have something like a custom whistle item in the player's inventory, which when used runs a script that creates a new path_corner (and removes the old one) and assigns that as the target of the NPC being escorted.
-
Thanks Lux for taking the time to give all that feedback, much appreciated! A few points:
I liked the tombstone easter egg. It was funny but not really funny? (adding humor to a horror mission kind of takes the player out of the experience if only for a second) Maybe seemed a little out of place. I did laugh a little though.
"Funny but not really funny" puts it perfectly. We knew it would detract from the horror atmosphere, but I'm a sucker for easter eggs... and it's something we joked about right from the beginning. You did light the candle on the tombstone, right? If you didn't, you definitely should go back and do it
I'm not sure if it was a default night sky or not but the blinking/twinkling on the stars really needs slowed down. Its distracting, almost manic, and also hard to ignore.
That one is default. Maybe it should be pointed out in one of the threads about basic TDM materials.
Also, the music while you're out in the yard is a little too loud. We don't have a separate volume slider for music so turning that down means the SFX are also toned down which I didn't want. Just seemed a bit unbalanced.
This is one thing that I have always struggled to get right. Setting default levels of sounds is almost as much of a pain as setting the levels of ambient light, because the players hardware / audio configuration affects it so much. The thing with the volume sliders is something I'd hope to see cleared out in the future.
I think it was an excellent use of suspense but I think there was just too much suspense and not enough of anything actually "playing out" other than what I thought might happen after reading the readables. Then something does happen at the very end and its over in like ten or fifteen seconds when you figure out you can't go out the doors and there's that open window in the stair well. I was honestly hoping for a little more but I wasn't dissappointed at all.
Yeah, while I wish we could have provided a bit more fleshed out experience, I think in a way it ended up short and sweet. I'm hoping to continue working on a larger map in a similar snowy environment, so hopefully then!
Thanks once more to everyone so far who has provided input. It's feedback like this that helps mappers to get better!
-
1
-
-
@Cookie
The pathfinding for the creature upstairs is somehow wonky. I'm not sure what influences it, but sometimes he simply walks to the hallway and stops there completely against his assigned path. We only had limited time to do bugfixing (due to the Halloween contest) so eventually we just had to push it out of the door and hope not too many people run into that bug.
Regarding the sound / screen shaking, it's intensity correlates with your distance to the creature. In hindsight the rumble effect could have been killed after a certain period of time, but I belive this is the first time it was used to create an unsettling effect on a character. Hopefully future mappers will learn from our attempt!
-
I got the same or similar error:
Joint 'Head' not found for attachment position
'velvistcap_1' on entity
'idAFAtchment_atdm:ai_head_base_895'
Things star normally with the pregame text followed by "buy equipment". The game seems to load and the immediately produces the error (displayed on a DM text box). I tried deleting the "exhumed" folder and re-downloading with the same result.
Did you try updating your installation of Dark Mod? You can use tdm_update.exe in the darkmod folder to update to the latest version (currently 2.02)
SFX Add-on for mappers / SFX requests
in Music & SFX
Posted · Edited by kyyrma
I noticed OrbWeaver talking about the weak water stepping sounds, so I decided to try something out. Give these a listen:
movement_water_01.ogg
movement_water_02.ogg
movement_water_03.ogg
movement_water_04.ogg
I tried to eliminate the sharp splashes and make it more of a wading sound. I'm not entirely satisfied with the result though.