

Nosslak
-
Posts
679 -
Joined
-
Last visited
-
Days Won
3
Posts posted by Nosslak
-
-
Shadow meshes can also be more like an old school bush. basically just an x from one direction (doesn't have to be a 'hull'.). That would still cast the volume of the model pretty well in most cases.
I don't understand what you're talking about, again.
I just did a quick ase in DR (I'm really digging this option for simpler stuff) and got the same results I had gotten before.
Notice how the bottom tri casts shadows onto the object in game. Looks like it's the backside of the shadow material that does it. I tried shadow2 (instead of shadow) also, this is a NoSelfShadow tex I believe, and yet it still had the same effect.
Damn, that's no fun.
I'm sure it has something to do with ase, as Spring said he's done models like this and they are fine. I even remember seeing lwo's that I could see the shadow sticking out of in editor, but in game they rendered fine.
I don't know WHY it would matter between file types, but it does seem to.
Perhaps I can get Spring to export my model to .lwo later on then.
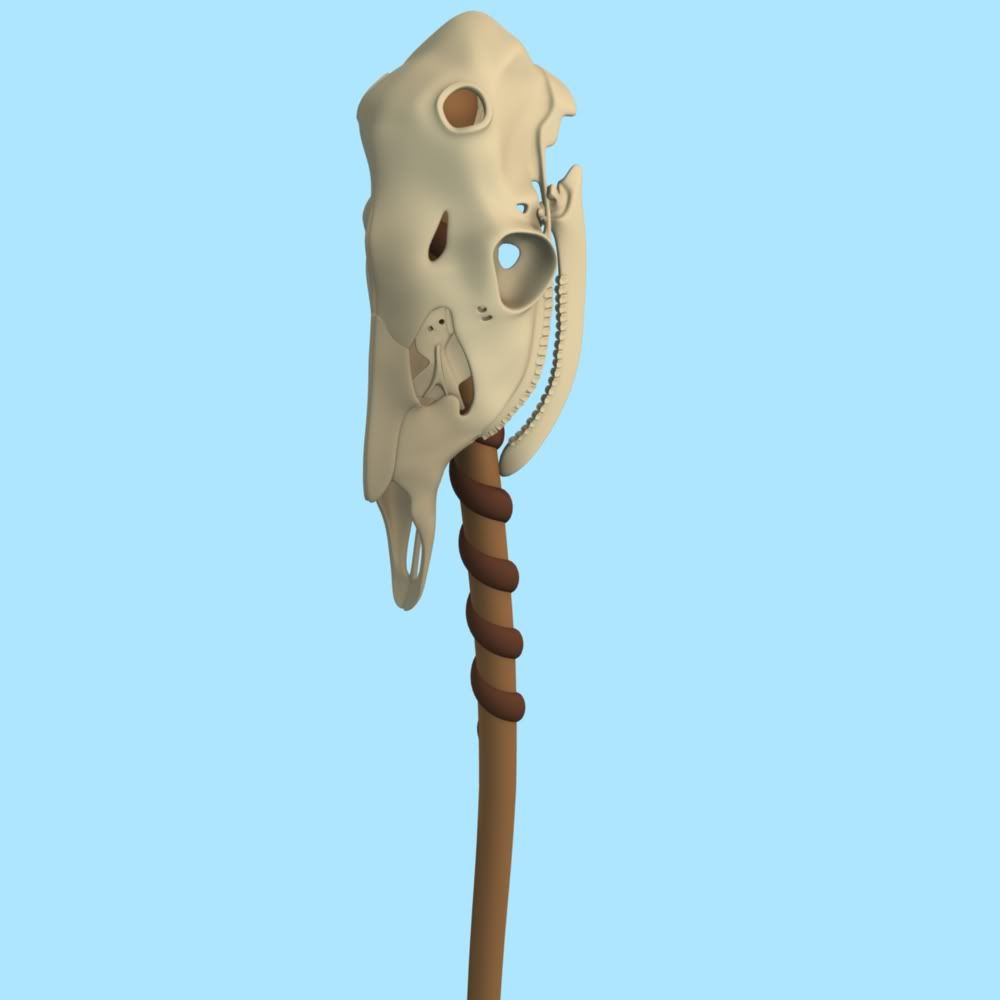
Off to better news: I think I'm finished with the modelling of my staff. Here's how it looks:
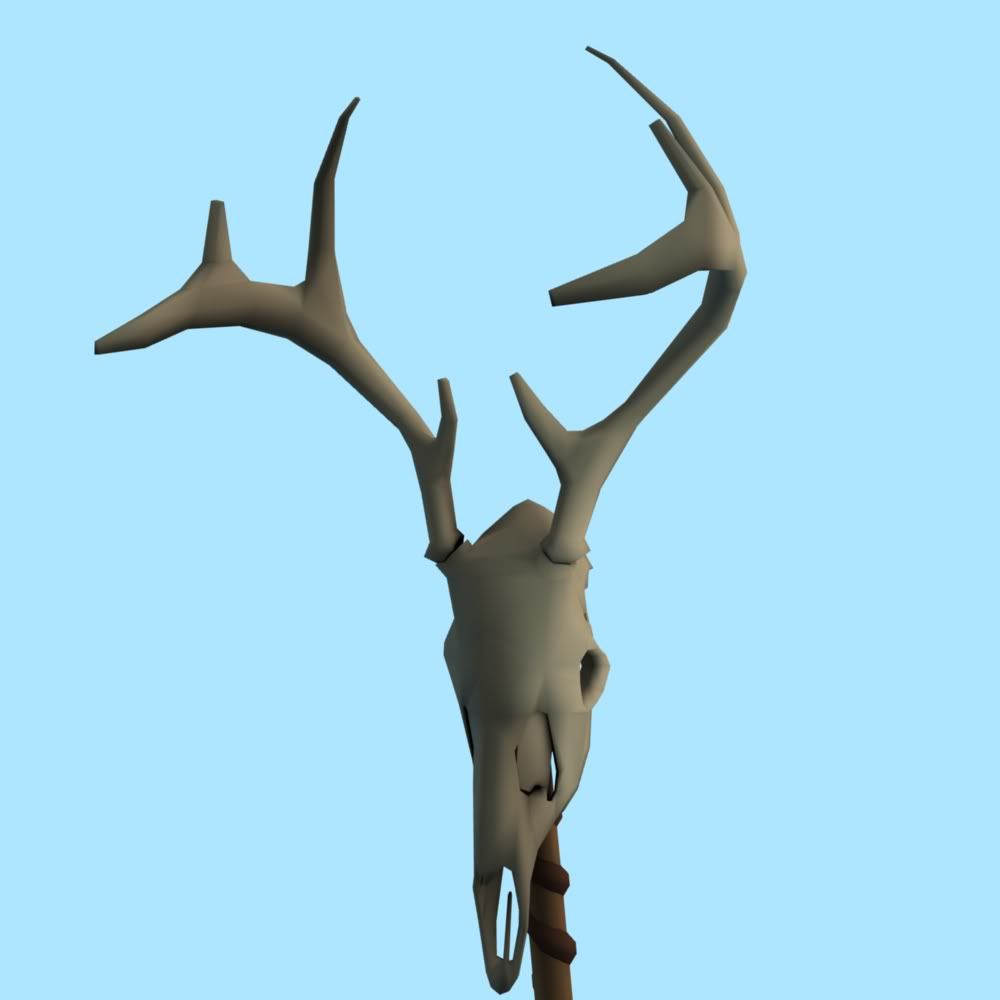
1678 polygons total.
-
I think you can do a very very simple shadowmesh and it will still look ok, nobody is able to calculate in their head how the shadow has to look, anyway

But still, a similar size/shaped blob is good enough for shadow.
Yeah, but as far as I've understood the shadowmesh have to be entirely inside the regular lowpoly surface otherwise it will cause shading errors and because my skull has a very thin thickness it will be hard to make the shadow mesh much more lowpoly without making it intersect with the regular mesh.
Anyway, thank you for your work, its awesome to get new stuff for TDM
It's great to be part of a big project, so thank you too.
Not taking the shadows on your mesh (though you might wanna check smooth groups if you get weird shadows), viewports are never the best at displaying lighting anyway.
Yeah, I've noticed this too.
I'm taking about whether or not the shadow mesh sticking out actually casts weird shadows onto your model in game.Maybe I'll just do a test tonight and make sure I'm not wrong (or that I am wrong).
Yeah, it'd be great if you could test this as it would help me make a lot more lowpoly shadowmeshes.
-
With alpha I bet you could get the main skull down to 400 easy.
I'm making that thing in the hole under the eyes out of a plane with alpha instead, so now it's using only 890 polygons. I'm pretty sure I can't reduce it to 400, perhaps 600 but not much more.
You might want to test the shadow mesh. It's been a long time sice I've done those tests, maybe there was another factor that was causing issues.
Guess I should retest myself, I just recall having issues with the shadow showing if it stuck out....
I don't even know. I have no idea what you're talking about. If you're perhaps talking about some of the shading on my mesh then that is because I've had to reduce the amount of polygons a lot and also I'm just rendering it from Blender without any shadow mesh.
-
Anything more than that is awfully high for a relatively small model. But the shadowmesh is ultimately more important.
Okey, but I fear that it'll be hard to make a lowpoly shadowmesh that is entirely contained withing the skull, just as with the cutlass.
Believe me, young padawan, you are not trying hard enough
Seems like you were right, I just managed to cut away about 400 triangles, so right now it uses 1054 of them.
So, if you want to move on to other models, thats fine.I'll try to make one LOD version for it but that'll probably be the only one.
Here's how it looks:
I'll use an alpha-map for the holes.
I won't even bother saying it this time.
-
Looking good, but as Bikerdude said it's too clean. Also I think it should be a lot smaller, right now it feels too big and not messy enough.
If you want I could try to model a tong in Blender real quick for you. Shouldn't take much more than a couple days tops. I'd need some reference to work from as well.
Thanks for using my pair of bellows.
-
I haven't used Max but shouldn't it be possible to just make a plane over it, unwrap it and then bake to it? That's how you do it in Blender and I thought that how you did it in every other program too. If you want I can import it into Blender and bake it from there.
-
http://bugs.angua.at/login_page.php
You might need to request an account first, I think greebo manually enables them. Then just select your project "Dark Mod", and add it under the proper section. Someone will then grab the bug and close it (hopefully
Alright, I've made a new entry on the tracker now.
Regardless on how many polygons it contains, please make a mid-poly version (roughly half of whatever your final version has), and a low-poly (roughly 1/4) as well as another version with even less polygons. (Yeah, these can be done later with automatic tools, but since we don't have someone with these tools or an idea how to use them, it is much easier if the original modeller does these versions).
I'll try to make one of the LOD-models at the very least, but I really don't like to redo work and I'm not too fond of removing details from my models either so it might take a while.
These versions will help performance due to the LOD system that can use them when the player is far away. 1700 polys for such a small model is way overkill from 5m to further away (Not to speak of giant forest with one of these planted alongside a way in 50m distance Just so we're on the same page: It'll use quite a bit more than 1700 polygons, they're just for the skull.
Right now I'm down to 1492 polygons and I can't really optimize it much more now (for real this time).
-
Depends what you do with a shadowmesh, I guess. Our mounted antler model is about 900 polys with a 300 poly shadowmesh. You might be able to double those numbers, but more than that would be pushing it.
Alright so can I use a maximum of 1800 polys for the skull, skull + antlers, everything or what? Please be more specific. If you meant 1800 for all, then I'll have to use alpha maps, make it really lowpoly and it won't be very pretty. So far I've managed to cut away about 300 polygons without losing too much of the shape, so it's currently at 1700 polygons.
The deer skull is looking awesome!
Thank you!
-
It doesn't look like shite:

I think I'm finished so I'll start work on the lowpoly version now.
BTW how many polygons can I use on this? Right now the skull uses about 2000 polygons without antlers staff or anything else included. I'm not sure I can optimize it much more while still keeping it somewhat smooth and detailed. So how many polygons would you say are appropriate?
-
Alright, here's an update on the staff status:
The antlers are mostly finished, though I think I'll try to import them into Zbrush and rough them up a little. This will be one of the first things I try to do in Zbrush so I can't guarantee anything that doesn't look like shite.
-
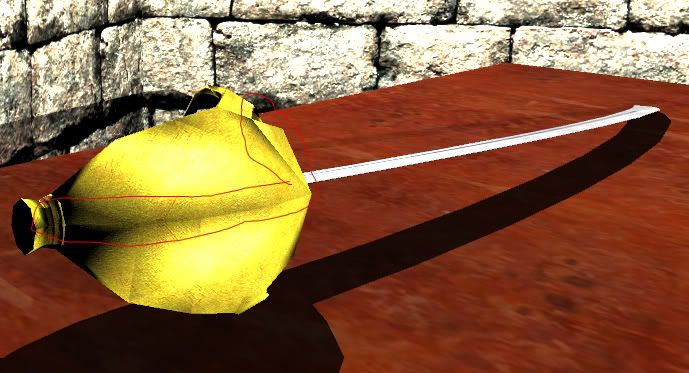
Badcog & Serpentine helped me fix the Bellows model.
I put a new .pk4 here:
http://jdchoate.mcn....dia/bellows. pk4
There was a missing closing bracket '}' at the end of the .mtr file as well as a mis-named bumpmap texture .tga file (was missing an 's'). Serpentine also tweaked the .ase file. After those 3 fixes, the model now renders in TDM as well as in DR.
Weird, it worked fine for me, but still I'm happy you got it to work.
Should we include the model into v1.03? If so please file a tracker entry requesting it
That would be awesome! How do I file a tracker request?
-
Are you saving it in a DDS format that supports alpha? Also are you need to use an alpha channel (basically you paint the transparent parts black and the solid ones white [could be the other way around]) otherwise it won't work.
Also, yes there is some material definition missing. You can download one of my models and take a look at the material def for either the streetlamp or the privacy screen frame.
-
In return you could explain me how you made that 'Click Image to enlarge'-code. When I look at your posting-code the images are already there! Is that a feature from Imagehack?
If you post any images that are wider than the forum width the forum will automatically resize it to fit, this happens with Imageshack, Photobucket and most likely any other external site that you host images on (instead of attaching them to the posts).
-
I am not sure the staff needs the jawbone. On the other hand, since you have already done the work, it may make for a nice extra model - so we'd have the staff, we'd have an upper skull and we'd have a jawbone. The latter two may be useful for crypts, middens, various Pagan decorations, plus never forget how much Samson accomplished with just one jawbone.

I'm not really a believer so I'm not familiar with the Samson story, but it still sounds like a good idea to keep it, so that's what I'm going to do.
Personally I think it looks awesome as is! But if you want more detail, then I'd do the following.I'd keep the bottom jaw off, since those tend to detach naturally during decomposition. Maybe a nail or spike in the top to attach it to the end of the pole?
I think I'll stick with just using some strings to keep it attached, but thanks anyway.
Also, many deer skulls (but not all) are raised a lot more where the antlers attach.I hadn't noticed that. I'll try to make them longer before the next update.
Hey Noss, I had the skull texture pretty much done this morning and then my power went... and CS5 seems to have done bad things to my working copy! Aaaanyway I'll sort it out this afternoon and get it to you asap.
No worries, I'm still not even done with the highpoly and haven't started the lowpoly yet so it'll still take some days until I'll have a use for it. Thanks for the help.
-
Is this a material (.mtr-file) thing or is it set in blender?
It's a material property.
What's a prop?Props are basically the things you place on the map that isn't level geometry (like chairs, staffs and medals).
The collision mesh is in blender, a simple cylinder with a narrow end.
I'd recommend that you name the material collision as that'll make it a bit easier when you're changing bitmap paths.
-
There's a new Blender version out, 2.54 Beta this time around:
-
The jaw does look a bit odd actually, but I can't judge if I think that because of skulls like it usually not having any jaw, or some other reason.
I forgot to say that I didn't model a full jaw as that would be too long (I tested, it was not pretty) so I broke off maybe 1/3 of it, but I don't like it either.
I do have an idea for how you could make it look more attached to the stick, how about you take a strap and pul through the holes where the horns were? and if you're feeling ambigious you could try with the cracks above the eyesckets too. I figured we wouldn't want the eyesockets used for it as they can have gems and things like that in them in custom versions.I was considering this, actually, but I hoped someone would come up with a better solution. I think I'll go with this approach.
EDIT: Also I was planning to try to make some antlers for it too so there won't be any straps though those holes.
-
You could try adding a very basic bottom jaw on the other side, as if the skull were eating the pole almost?
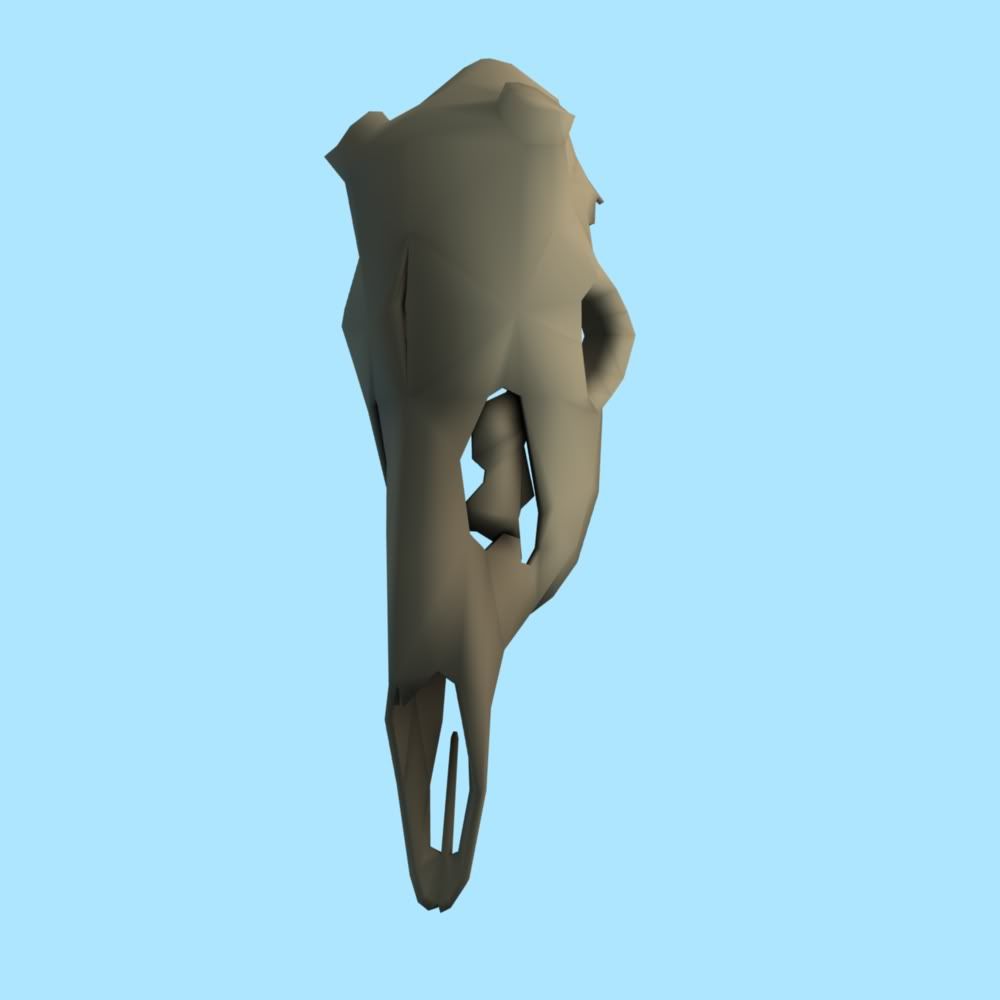
I tried making a jaw for him as suggested but I'm not sure I like it. What say you:
-
If Melan is in the mood I'd be happy to take a higher res copy of that texture and turn it into seamless bone. (the final result can be scaled down as I dont think we're going to have many buildings made completely from a single carved bone
)That sounds great, thanks.
But I'm really impressed with that skull, it looks a bit strange in 2D, but I think it must look quite interesting in full 3D. Noss
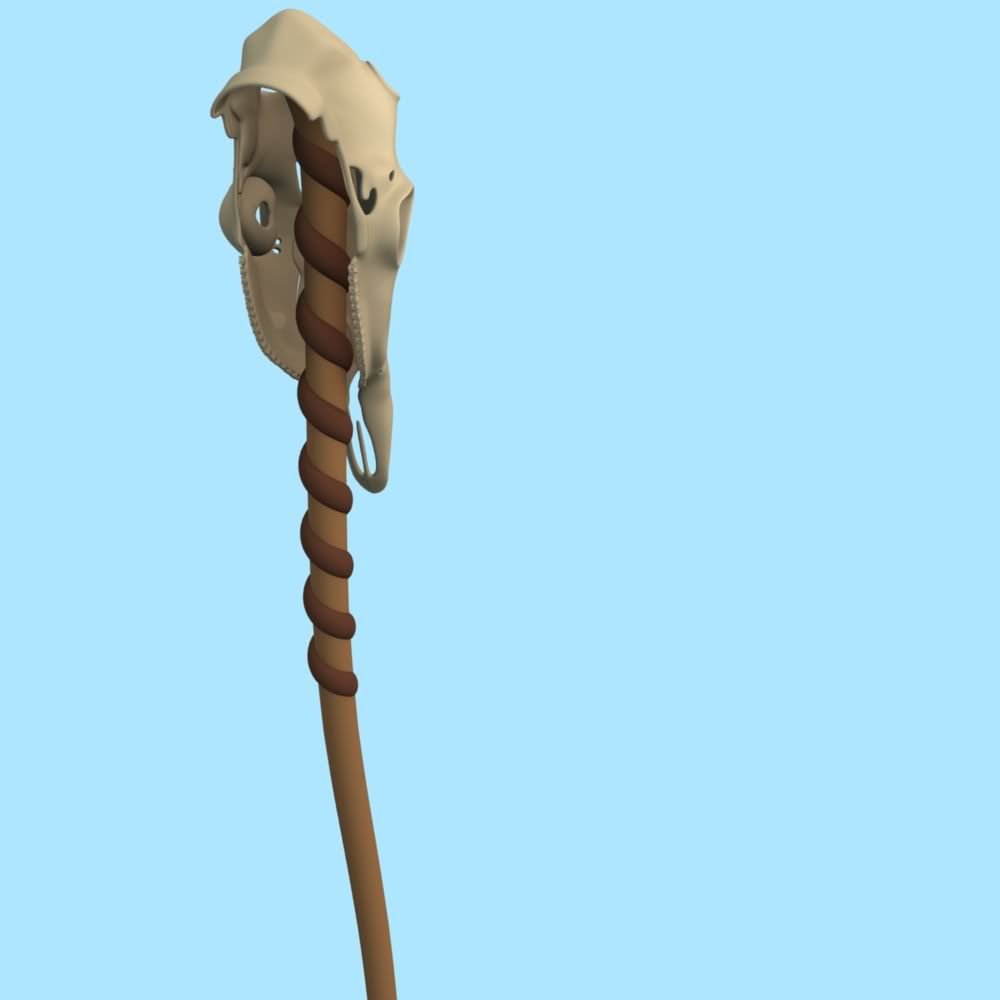
Thanks, I'm pretty satisfied with it myself too, except the back as the skull is just hollow and it just sits on top of a stick, but I really have no idea how to make it much more interesting. Here's how it looks right now:
I think I'll have to smooth out most of the inner parts of the skull but I'm not sure.
Also I think MSN stops our convos at times, I always get a message from you then send a lengthy reply and that seems to be the end of it... donno if its related to your invis status tho

Oh, I thought you were just sick of all my questions so you decided to ignore me. Also I'm almost always online on MSN as I have it on autostart and I keep my comp on the whole day except for when I go to bed, so you should easily be able to reach me when I'm online.
-
Very good shape. It may need a bit more creamier texture - this way, it is a little plastic-like.
Thanks!
Aged bone, like on a staff, would be slightly yellow.Yeah, I know it need a more interesting texture. This is just the highpoly, which you never texture, you just use it to bake normals, ambient occlusion onto the lowpoly which you give the interesting textures to.
something like thisThat texture is more or less unusable as there is a big crack in it. I tried looking around but couldn't really find any good texture, so I might have to make one myself
 .
. -
Alright, here's a small update:

Basically I'm finished with everything but the antlers and maybe not the swirl on the staff, I might change that a little. What do you think, gents?
-
You can work around testmodel spawning in the ground by looking up or using noclip. It's less than ideal but still advantageous since you can test models in existing maps without editing said maps.
Yeah, I might do that, though it feels like it might just be easier to put it in with the editor.
I don't see why shadow meshes would work differently when exported in one format over another but anything is possible. If there's any truth to that then it's a bug that should be documented for when the engine goes open source.
Yeah, I thought it sounded strange too, but that what I've been told.
If you want to avoid intersecting, build a mesh that fits inside the visible object. Don't worry about topology, volume, scale, or accuracy. The only thing that matters is that the shadow cast by the shadow mesh resembles the object it's supposed to represent. If you're having trouble with it, send me the .blend and I can provide you with a suitable shadow mesh from which you can learn from.
Yeah, I know, but it's not so easy to make an even more lowpoly mesh for an already low poly mesh that is round and hollow.
If you intend to make game ready content, it's in your best interest to continue working with ASE because it's the only format that affords you the ability to start with nothing and end up with something working in game without any assistance.
The second you export to LWO, you relinquish the ability to get the model working in game to those who own Lightwave. By all means send LWOs but it's no longer your problem if those models don't work.
In Lightwave materials are called surfaces. To make a game ready LWO the surface name is where you put "textures/darkmod/metal/grate/dimpled_grating01" . Translating that into Blender terminology means you would name the material "textures/darkmod/metal/grate/dimpled_grating01" (which isn't possible as stated above) and then export to LWO.
Since you aren't exporting to LWO, this isn't a problem. Should you choose to start exporting to LWO, it will be. Someone with Lightwave will have to fix all the models you export.
Alright, the .LWO's doesn't seem to offer any real advantages so I'll stick .ASE.
I don't have any advice ATM for the mirroring issues. I'll have to review the topics on D3W and get back to you unless someone else has something to offer.
Please do, I've been having a lot of problems with that so it'd be great if you could find a solution.
it looks good imo
Thanks!
Why one earth would Blender put a hard cap on the material name length?
In a pinch, you could always make a new material shader with a name that is less than 32 characters...most of the existing model shaders already are.
I think I'll just skip the .LWO and stick with .ASEs, but thanks anyways.
-
You have to place your models somewhere in the "models" folder. Then with a map loaded you just type the relative path like this...
testmodel models/darkmod/nature/plant_05.ase
It wasn't as good as I had hoped. I was under the impression that you could just pick it up and place it anywhere with that command but it seems that Doom 3 just places it where I'm looking, with most of it under ground.
You can't alter LWO files in a text editor because LWO is a binary file type. In other words, the data contained therein is encoded as a bunch of ones and zeros. That's why when you open a binary file in a text editor and the program tries to decode the data into readable characters you end up with jibberish.
You won't be able to use Blender to produce LWO files that work in Doom 3 without jumping through hoops. You should continue using ASE. I don't see why you aim to switch anyway. What do you stand to gain?
Baddcog said that lwo's sometimes are more forgiving when it comes to intersecting shadow meshes, also I think Springheel (might have been someone else) complained because he can't open .ases in his program of choice so it'd help that too.
In Blender you're only afforded 32 characters when naming a material whereas in Lightwave the limit is much higher. Case in point if you have a model that uses the texture "textures/common/caulk" exporting from Blender will work fine but "textures/darkmod/metal/grate/dimpled_grating01" will not because the name exceeds 32 characters.
Yeah, but you don't have to name the material the same as the filepath, right? I thought you just had to change the filepath for the texture (that's what I've done with .ase's.
Also I'm having problems with normal mirroring, again:
Only the seam that is parallel to the blade is a real seam, I don't even know why there is a seam/hard edge on that other place.
Also this:
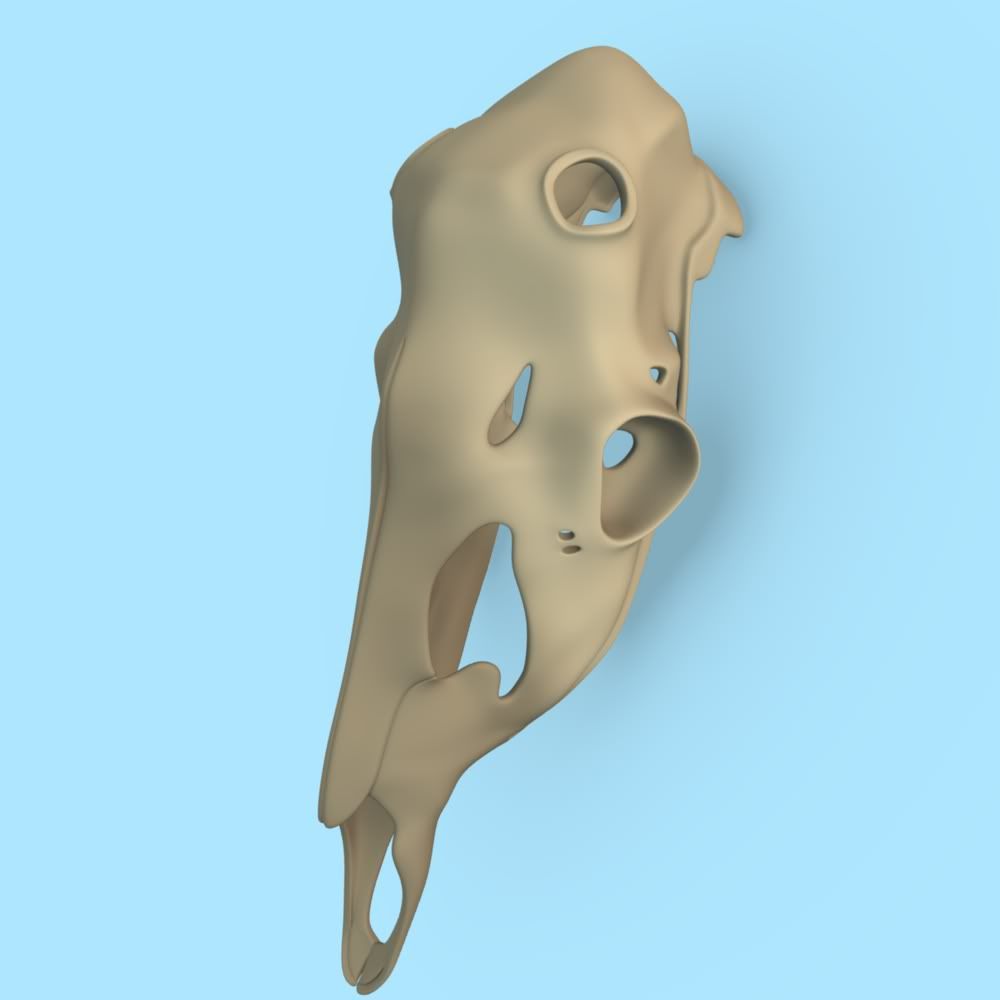
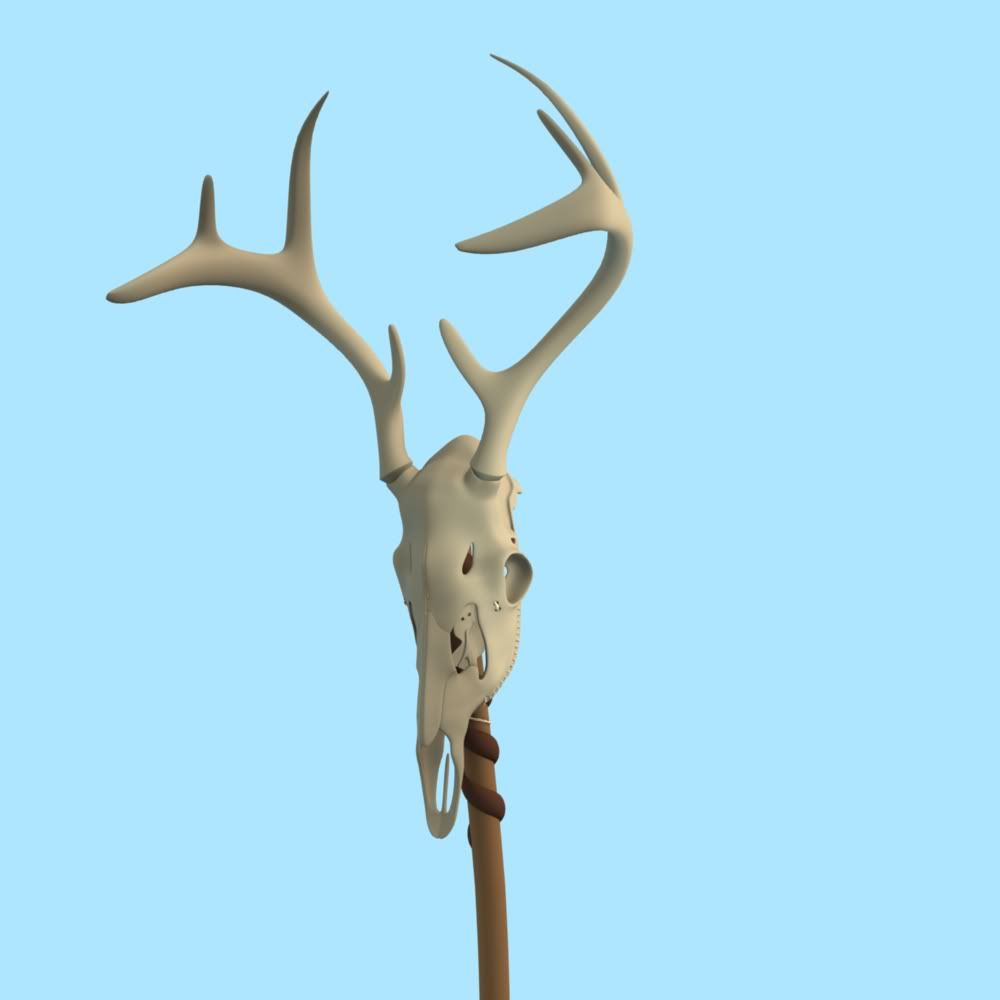
Do we have any hunter on-board that can confirm that it looks like a deer skull? It's not finished I will add some teeth and smaller bone parts in the nostrils and those other holes above them.
-
lwo you just have to set up the paths in lightwave or blender. Can't edit like ase. I don't use those files so I haven't gone through it. Maybe the Wiki has info.
There doesn't seem to be any info on the wiki about .lwo's and Blender (only .ase's).
No, just use the shadow tex, but actually make the polys double sided. Doom would do it anyway with a two sided material, but there isn't a two sided shadow material.clone, flip normals,attach
Sounds like I might just as well just model it as I would anyways then.
In Lightwave you just use the shader name as the surface name.
When I export to .ASE with Blender all I have to change is the bitmap path which is the same as Blenders texture filepath, so I just tried to paste "//base/cutlass_gold" into it but it doesn't seem to work. Anyone got any ideas on how I should proceed.
Right now the shadow-mesh has got about 280 polys in it. Is this acceptable?

Fan Mission: No Honor Among Thieves (2010/04/29)
in Fan Missions
Posted
This might have been answered already but I don't want to look through the whole thread for it a third time (had to look through twice to find the exit on the first mission). The problem is that TDM doesn't seem to find the 'hips' joint position on the cityguard when his weapons sheathed (or something like that) when I try to load NHAT 2? This is with a fresh install that I've just played NHAT 1 on. What to do?