R Soul
-
Posts
185 -
Joined
-
Last visited
-
Days Won
9
Everything posted by R Soul
-
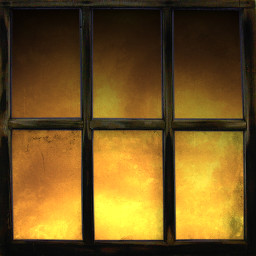
I'd like to show an alternate version of textures/darkmod/window/largesquare02_lit The mtr file is missing the 'glow' stage, but even when added, the yellow background is very flat. Original version: Here's a preview of my alternate version (the editor image): I brightened this up by mimicking the TDM's glow effect (layer addition) I also noticed the unlit version was missing a specular map. This file contains the fixed 'lit' mtr file, new lit texture and the unlit spec map (I'm not sure if the lit version needs it). new win glow.txt (the above is a renamed zip file)

-
 A tiny update, same links as above. I found that the material name scanner woun't go to the first line in an .mtr file, so this wouldn't have found the extremely rare occurrence of the material you want being defined right at the start of the file. Most files begin with a comment. I discovered the bug due to writing some custom materials.
 -
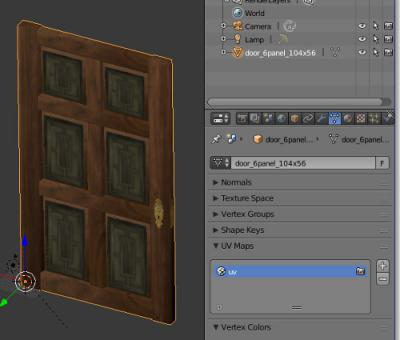
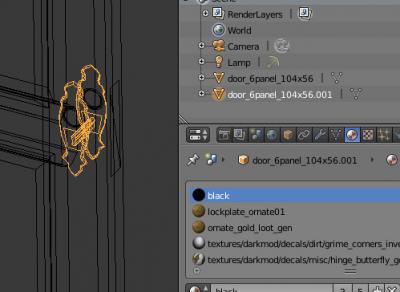
You will now have one mesh for each mapped UV channel. For each mesh: Delete all of the unmapped UV channels so you are left with just one per mesh. Give each object's remaining UV map the same name. It doesn't matter what it is (I prefer to keep it simple): Now the meshes can be recombined. Select them all and press Ctrl J: All UV mapping is now visible.
- 1 reply
-
- 2
-

-
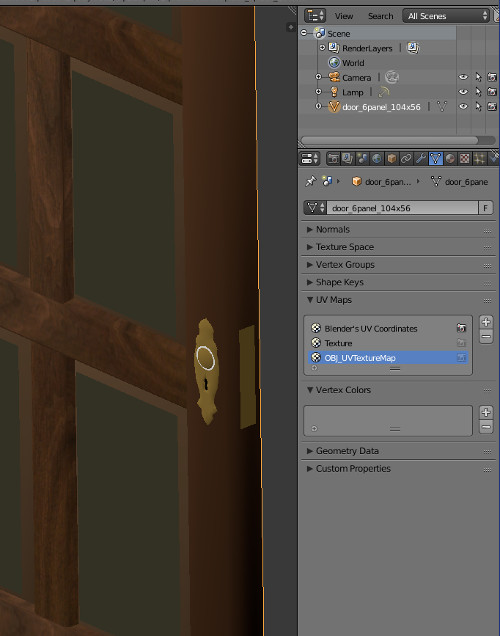
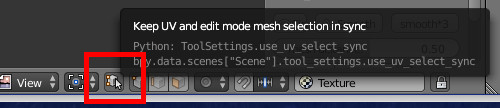
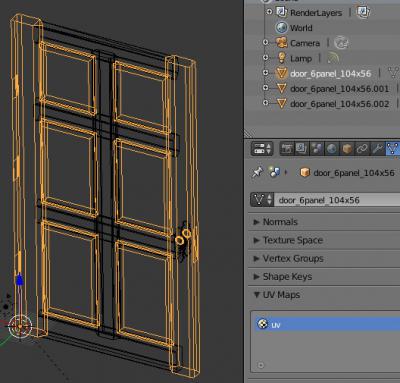
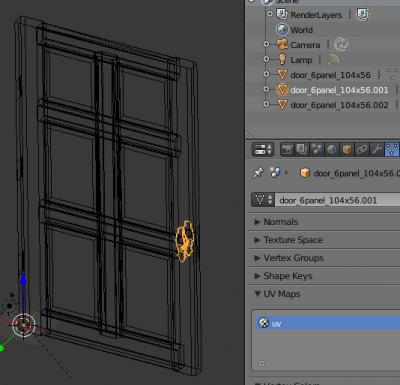
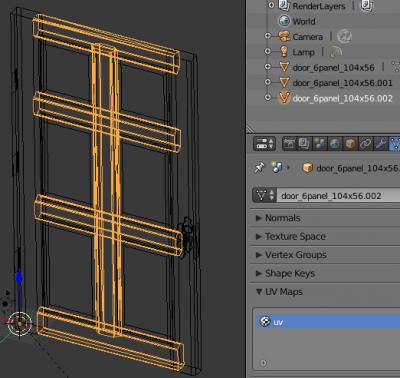
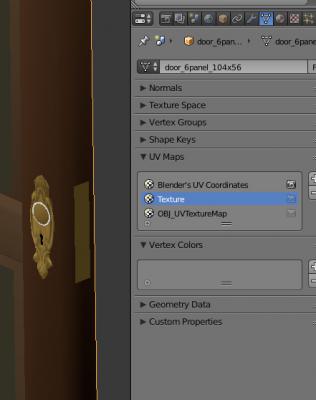
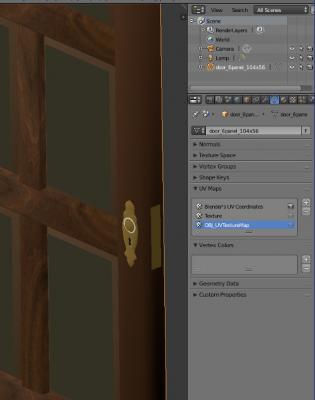
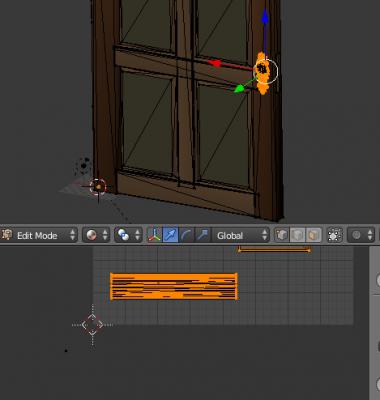
I've noticed that some .lwo models I import into Blender have their texture mapping split into multiple UV channels. It makes editing hard and re-exporting impossible because only one UV channel will be considered. Here's a simple way to combine all the UV channels: Here's an example of a door, where some faces have visible UV mapping and others appear to be solid colour only: When looking in the Object Data you can see it has 3 UV channels: Selecting the other two channels shows that the plain faces do in fact have mapping: To combine the three of them so you can see and export all of the UV mapping, you have to split the object by the UV channel, delete the unused channels from each object and then give each object's UV channel the same name, before combining the object again. You can leave the first channel alone. Select the second channel, go into Edit mode and also open the UV mapping panel. Click on the button shown here to ensure it's active: In the UV panel, select everything (A to toggle). In the lower left corner (or perhaps somewhere else) you'll see what looks like a single vertex: This is actually all of the vertices belonging to the other UV channels. Use the box ( B ) or circle ( C ) select tools to deselect them (Middle mouse click/drag). That will limit the selection solely to the faces that are mapped in the current UV channel: In the 3D panel, you can now split the selected faces (P) to make a new mesh: If there are more UV channels, select the original mesh, select the next UV channel in the list, and repeat the above process. Continued in the next post due to attachment limit being reached...


-
Updated to version 2.8.0, which is for Blender 2.80 and onwards. The version for 2.79 is here: https://github.com/RSoul82/Blender-TDM-Material-Manager/tree/Blender-2.79-archive Download (for Blender 2.80): Go to the GitHub page: https://github.com/RSoul82/Blender-TDM-Material-Manager Right click the .py file, then go to Save As and put it in some folder. (Or go to Clone or Download and save it as a zip file to your computer). Be aware that this file isn't synchronised with the one on my PC, and the latter is the one that gets uploaded to Github, not the other way round.
-
Is it possible to turn off the sound in game with a single option or command line switch? I sometimes feel like listening to music while working on things, but the in-game sounds can get in the way a bit. All of my audo sliders are at the same level, so I can drag them to the minimum values without upsetting the balance, but I can still hear things faintly and I'll probably forget I've done this, and later on wonder why I can't hear anything. Edit: I opened up the .exe in Notepad++ and did a search for 'sound' and found s_noSound. I already have two shortcuts - one for normal TDM to play FMs, and an editing one with the easy console enabled. I can have a third one with the console and +set s_noSound 1. It seems to be a startup-only command though; I can't get the sound status to change in game.
-
HI all. I tried to export some terrain as obj, but when the centering option was enabled I got an error about an object not being defined on line 228. The line is this: vert -= Vector3(xcenter, ycenter, zcenter)It should be this: vert -= dr.Vector3(xcenter, ycenter, zcenter)
- 1 reply
-
- 1
-
-
Another bump. The addon now handles collision and shadow materials better than before - textures are now loaded when material names are set. When material names are set from the assigned texture, be aware that collision materials share the same texture, so there's no way to know the correct material name. You have to set them manually, but with the NoChange custom property you only have to do it once per object. Links in the first post.
-
Bump! I've implemented material and texture extraction features, so this should ensure all the necessary files are in place. See the first post. If that works, the remaining thing is collision materials. I didn't want to deal with them, but I think it may be necessary to make it complete.
-
It turns out that Blender can handle the .pk4 files just fine. I don't know what I did wrong the last time I experimented, but I might have forgotten to check the file extensions, causing Blender to try to open the wrong file type. I will now have a look at making some file extraction functions to help with installation. edit: The texture extractor is working fine, and I'll make an mtr extractor soon. The next thing I need to consider is what to do about collision materials. So far I've been content to ignore them and just use material transparency.
-
I had a look at the diamond object. The texture for that isn't in a standard place. The vast majority are in dds/textures/darkmod/... but a lot of the sfx textures are in textures\darkmod\sfx\. This makes the installation instructions more complicated. Currently it's tedious but fine if you're methodical (unless I missed something), but this new information annoys me. I also found that I'd made an incorrect assumption with texture extensions (dds if none specified in the mtr). I've now changed that to removing dds or tga from the reference, then looking for file.dds and then file.tga. I've also set up a warning message for the texture file not being found.
-
Thanks for the suggestion. See the attachments for my textures and materials. TDM_Textures.txt TDM_Materials.txt
-
Oh dear...any volunteers?
-
There's no obligation, but testing is for your benefit. Can you give me some examples of your folder setups? E.g. where is your copy of architecture\windows\warehouse_window_dark_d.dds? What about tdm_models_kitchen.mtr? There may be something in the path that is causing problems, but I don't know where to start. I already have a function that ensures paths are absolute, and that should ensure they are the right format (e.g. windows or linux) I had a look at extracting from the files, but while Blender can load zip files, it's not able to open pk4, which I assumed were just renamed zips.
-
The problem with the optional folders was a code error - I was checking the wrong variable. That's fixed. Regarding other problems, I didn't mention in my last post that the readme has been updated. Please use that to ensure you've extracted everything that's necessary. On my machine I tried the addon with those files in other locations and it worked fine. For the second update I've made an addition to the optional FM paths system: They no longer have to be blank. They can also begin with a semicolon, which has the same effect while allowing you to keep some text in there. I've also tweaked the error reporting, so if you still have problems it may be easier to see what it thinks it should be looking for. Links (same as in the first post) Download: http://catmanofiowa.com/RSoul/TDM/TDM_MaterialManager.zip Readme: http://catmanofiowa.com/RSoul/TDM/MMReadme.html
-
I've updated this, and called is version 2 because of the changes. It no longer uses the simple material-texture list; it scans the mtr files each time. This is much more reliable. It makes it clear if a material name is too long, and puts the attempted name in a custom property so you can easily search for it in the original files and make a copy with a shorter name. If a texture is used by several materials, the addon will always stop at the first one it finds. You can now set the correct name and use a custom property to prevent that material being renamed again (see the readme).
-
I think most of these problems are caused by me thinking all material names start with 'textures/darkmod', and wanting to use the pre-generated list to simplify the code for the two main functions. I'm currently redoing the code for 'Load Textures' to take the objects material names and look in the mtr files themselves. The other one, assigning a material name based on the texture, may be harder due to having to go backwards through the file, but I've done hard things before.
-
I'm not sure what to do about material names being too long. The short material names are probably skins. I'll look into those files and see what can be done. As for the other problems, please post some examples.
-
I've made a minor update. I hadn't taken into account that some material name lines have comments in them, so these were being partially added to the material name. That's now been corrected. The download link is the same as before. The best way to replace an addon is vis User Preferences > search for addon (the letters TDM should reveal it), click on the Remove button and then Install From File.
-
A few hours after the first upload it occurred to me that I might have uploaded an older version of this (which didn't account for some situations), so I re-uploaded the file. To be sure you have the latest version, the zip file has a modified date/time of 27th November, 7:27 and the py file is 27th November 0:26.
-
When exporting from Blender to TDM in .lwo format, it's necessary to set the material names to textures/darkmod/,,,,something. If an object has a lot of textures it's going to be tedious to search the mtr files to get the right name. The same goes for applying textures to imported .lwo objects. I wrote this plugin to make that task much easier. Version 2.8.0 Download: Go to the GitHub page: https://github.com/RSoul82/Blender-TDM-Material-Manager Right click the .py file, then go to Save As and put it in some folder. (Or go to Clone or Download and save it as a zip file to your computer). The old version, for Blender 2.79, is here: https://github.com/RSoul82/Blender-TDM-Material-Manager/tree/Blender-2.79-archive (this is unlikely to be upgraded unless it causes serious problems) It'll be interesting to see how this is in the wild.
-
I got the material reader implemented in Blender. Paths are hardcoded so the next step is to have them set by the user.
-
I'm working on a couple of Blender Python scripts to make it easier to work with materials and textures. 1: Set material names from textures. In Blender, materials with any names are assigned to faces, and each material has a TDM texture (extracted from the pk4 files and maintaining the folder structures). The script uses the texture to work out the correct material name. 2: Load textures based on material names. This is for imported models, which already have TDM material names. It loads the diffuse texture of each material. To associate materials with textures I wrote a program that scanned all the mtr files and generated a simple list of the form material=texture and saved it to a file. That was written in C# but that's probably because I'm more used to that language. After getting back into Python scripting I think I could use that to also do that part too. Then the user would only have to extract from the pk4 files.
-
I've noticed that if I use the model scaler on any type of model (ase or lwo), as soon as the map is saved, it loses its material. In other words, all I see is the 'shader not found' texture. Is this a known bug? Is there supposed to be an mtl file? edit: I just found the model export option in preferences. It turns out it's only a problem with the obj format, not ase or lwo.
-
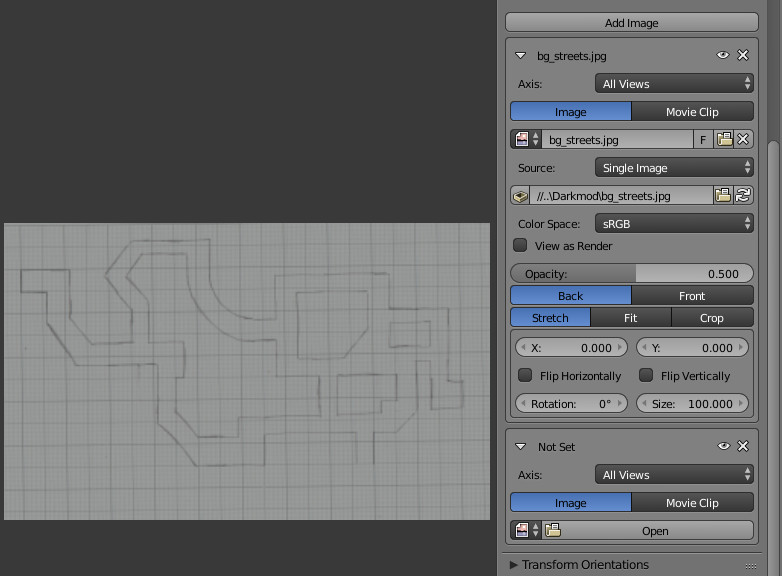
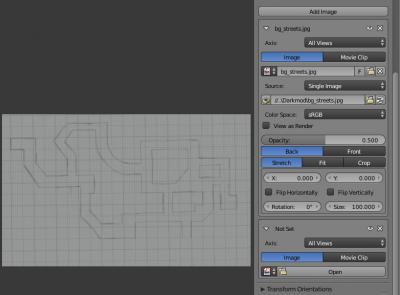
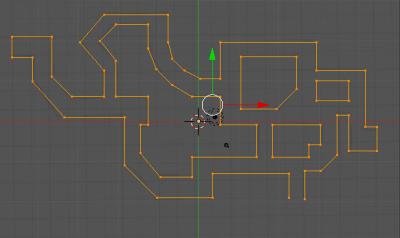
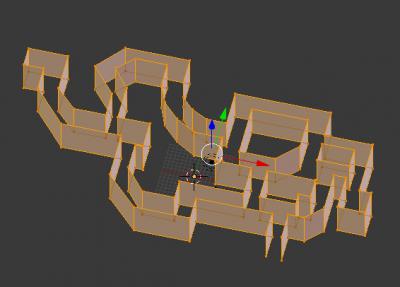
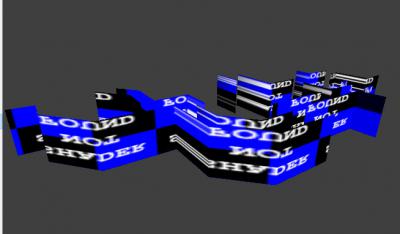
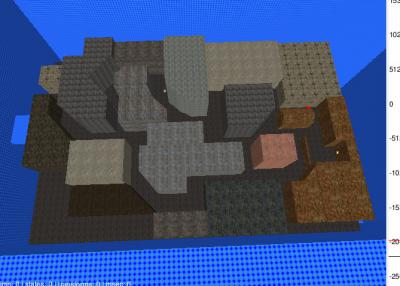
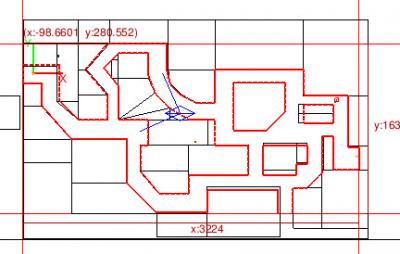
Background images can be very helpful but in Dark Radiant there are a couple of unfortunate problems (see here). I just tried an alternative which is good if you're using the image to set up a street layout: Most 3D object programs also support background (or reference) images (my choice is Blender), so load the image into that, and build a set of planes that follow the street layout. Then export it to any DR compatible format and you'll have a model that can be added to your map. Screenshots: Adding the image to Blender: A simple mesh that follows the layout: It may be necessary to give it some 3D shape, so I just extruded it: I gave it an invalid material name (with Blender & lwo, the material name is usually a DR material path) Model loaded and scaled up in DR: (The absence of a proper material means the object won't show up in game or be solid) Place any AI and use the model scaler on the street object to resize it until it's at the size you want. In the top view you can use the edges to determine the street layout. It's up to you how rigidly to stick to the plan, and other things like whether to deal with gradient, varying building heights as you build or as a second-pass.
- 1 reply
-
- 7
-