Search the Community
Showing results for tags 'textures'.
Found 5 results
-
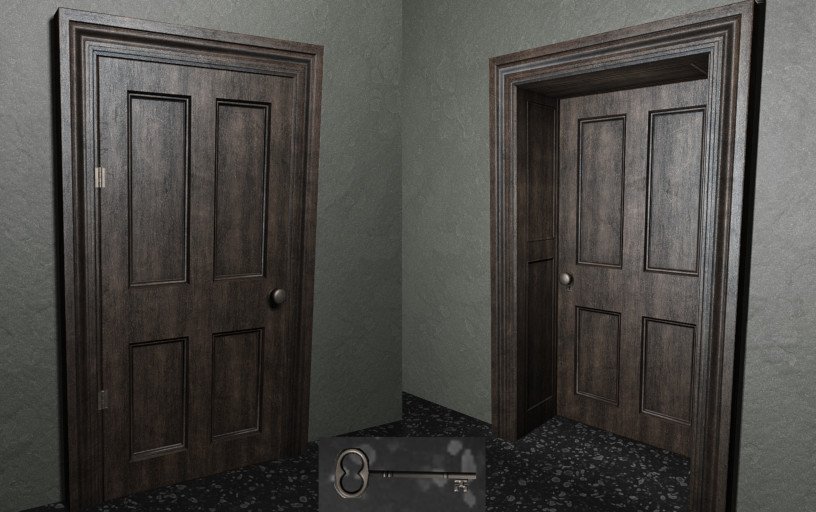
I have quite a few assets from WIPs I'll probably never use elsewhere, so I thought I could share it here. Some of these are older and not necessarily matching the TDM lore, but I hope someone will find use for them. In terms of package format, I'll be creating 7zip packages with just model and/or texture files, so you can place them wherever you like in your project. I'll also include example material or def setup. I'll leave textures in .tga format, so you can make edits on uncompressed source and save as .dds later. So first up is a door/frame/key combo: Temp upload of all assets: https://we.tl/t-BOdrlNEXWJ See readme_notes for design / placement instructions.
-
I have a suggestion for a new TDM console command that, I think, would be a boon to mappers. I think one of the most time-consuming parts of mapping is compiling the entire map in order to check out how a single change you've made looks in-game. The bigger the map is the longer it takes to compile, and the further away you get from efficient WYSIWYG editing (save for running TDM inside DR, of course, which isn't happening). There's two main things you really need to be checking in-game rather than in-editor: one is shadows and the other one is textures. I'm glad to say that shadows are no longer a problem with Shadow Map implementation. Before you had to recompile the entire map for the stencils to update, but now a simple map reload will give you updated shadows, it's fantastic. Texture changes, however, are still a problem. Even a single texture replacement requires a full recompile. r_materialOverride is a good, if limited, command that replaces all the materials in-game to a set value that you can get by copying a shader name in DR. I use it early on in the mapping process to save time laboriously trying one texture after another and recompiling. I need to know how a texture looks like, scaled and repeated, on a facade or whatever else have you, its density, its normalmap under lighting, if it's too bright or dark versus the ambient, if the color flows well into the other textures. ...Except not really, because r_materialOverride replaces all textures in-game, of course. As such I sort of have to remember how the level looked and try to focus only on the material I am trying to change. I propose a new console command that would be something like r_surfaceOverride. It would combine the usage and syntax of r_materialOverride (eg "r_surfaceOverride "textures/common/example") with the ability of another console command, reloadSurface, to target a single surface under the player's crosshairs. The way it'd work is it would only replace a single material, the one you're looking at currently, with your DR-copy-pasted shader name, and if you looked at another surface and ran the command again, the former surface will go back to normal and the current one will get overridden. If any developers want to chime in and opine on the technical feasibility of this proposal that would be great. If you, as a mapper, agree with me that a command like this would be useful, feel free do discuss it here. If permitted, I'll elevate it to a feature proposal on Mantis. And, of course, if something like this already exists, do let me know.
-
 This tutorial will cover the basics of preparing good textures for your custom materials. Youll get to know how individual textures work in TDM, and how to make them react to light in consistent, controllable way. Ill be using simple opaque materials for most examples. Once you develop decent basic workflow, it's easier to work with transparencies, glow, cubemaps, and other more complex materials. Part 0: Basic premise TDM engine (idTech 4) uses non-PBR workflow. This means that there isn't one correct way of making textures for your materials, they won't be physically correct. In pre-PBR games you have to make materials in relation to your lighting model, and TDM/idTech 4 is no exception here. That said, I think you can have relative flexibility here. As long as you don't use extreme values for your lights, you should be able to use the same materials in daytime and nighttime scenarios. Since the whole thing is a bit relative, it might be a bit overwhelming to figure out a starting point for your workflow. I found its useful to keep in mind a few ground rules (and this will be more important during in-engine tests): 1. You need an "average" light value for to establish a frame of reference. 2. Materials have to look correct with default game brightness and gamma settings. Brightness is 1, Gamma is 1.2. 3. Materials have to look correct without any post processing enabled, and they have to look good with default post processing on too. Burned highlights are acceptable for post processing, if the material looks as intended. Keep last two points in mind as you create textures and test them in the engine. First point requires some experiments to see how TDM surfaces, light gem, and AI react to lights. What I found out, is that you can easily use grey (RGB 128, 128, 128) light as a kind of "photo studio light" to ensure that your textures behave correctly in the engine and have proper colors. One thing you might want to keep in mind as well is falloff textures. My favorite multi-purpose light texture is falloff_exp2, as it seems close to inverse square method of calculating light falloff in other engines. I use it for most light sources, and it seems very good for tests. General workflow suggestion I prefer using Gimp and having each texture saved as .xcf file. I don't have to merge any layers, as Gimp uses "copy visible" option while exporting the result to .tga. Gimp will also remember the path and the filename after exporting, so, if I change something and want to export the updated texture, all I need is to use the Export shortcut (Ctrl+E), and update the textures in the engine with reloadimages command. You'll want to have these files open and available for edition and export simultaneously. That's because all images influence each other, and contribute to the overall look of a surface: Diffuse affects brightness, contrast, saturation, but also specularity and bloom highlights in post processing. Specular map affects contrast and can emphasize darker areas of the image, even if you don't see a light reflected. It also affects the look and strength of a normalmap. Normal map affects how specularity works on a surface, it also influences darker areas of the diffuse. Test environment map 1. In DarkRadiant, create an empty cubic room that youll texture with your material. Dimensions depend mostly on assumed texture scale. Typically, I use 2048 textures that will be scaled down 8 times (x 0.125), so one tile will occupy in-game space of 256 by 256 units. Since I want to check whether my material tiles properly, I often use a 512 x 512 x 512 cube. 2. Place a light in the middle of the room. If your room is a 512 cube, make the radius 512 as well. This way your light will hit the wall in the middle of its falloff. If you want to use more realistic falloff, use light texture falloff_exp2. Set color to RGB 128, 128, 128. 3. You dont want the light to decay into complete darkness, thats why you need an ambient_world light. Place another light in the same room, make the radius long enough so it encompasses the whole room. Make it an ambient light (properties -> Classname -> Lights -> atdm:ambient_world; light properties -> light texture -> ambientlightnfo). Set the color to something like RGB 8, 8, 8. 4. Apply your material on room walls, place PlayerStart inside, and save your map. Run TDM, compile and run your map. Now you have set up environment for testing materials. A test map with example wall material applied. Next part will cover diffuse textures, why its important to manage their color range, and how to do it in consistent manner.
 -
Hello there. I've been playing Dark Mod since it went standalone, and recently decided to try my hand at actually making a mission. I've installed DarkRadiant, and begun going through the beginner's guide (this one) without major incident. That is, until I reach the part about materials and textures. Looking at the Media Browser, nothing's listed. The guide says it might take a few seconds to load the textures for the first time, but it doesn't appear to be coming up with anything whatsoever. The most I can make appear is the default 'shader not found' and a blank, nameless texture. So... have I missed something? Are the textures part of a separate download? Or is it possible there's a problem with my install? Any help would be greatly appreciated.
-
Well, I was searching for some textures for my FM, And I couldn't find any, In honesty I couldn't find any textures , So I figured If you're going to post textures, you might as well link them here (Of course unless its included in the Dark mod, Then it's pointless) Hopefully this will simplify most of the problems with custom textures. Here's the format if you don't know what to use: Picture ExampleTextures - ExampleDescription URL to download here! (Doesn't need to be 18, Take your pick!)