PranQster
-
Posts
1922 -
Joined
-
Last visited
-
Days Won
39
Everything posted by PranQster
-
Would this be possible and has anyone considered it?: Instead of having the shopping for equipment occur before the mission starts (with free gold to spend), and instead of finding everything for free.... How about having a shop or a fence in town somewhere which the player could interact with, using gold which they have looted during the mission, to purchase weapons etc.? I always found the shopping of goods before the mission starts to seem a bit strange if loot is not retained from a previous mission like it was in the original Thief. I think it would be kind of cool to have to go to a shop in the middle of a mission to get something you need to complete the mission (say a mine, gas arrow, fire arrow, etc.) instead of finding one just lying around somewhere.
-
I kind of like the idea of a 'blessed/holy hammer'... perhaps a special vial of holy water to apply to it. When used against the undead it could either aid in killing them or it would repel them. They then lose interest in you for a certain amount of time before they become aggressive again, giving you a chance to slip away.
-
Oh yes, that will help, especially when comparing it with the doom3 tutorial I saw. Thank you!
-
Ahh. Thanks, that will help.
-
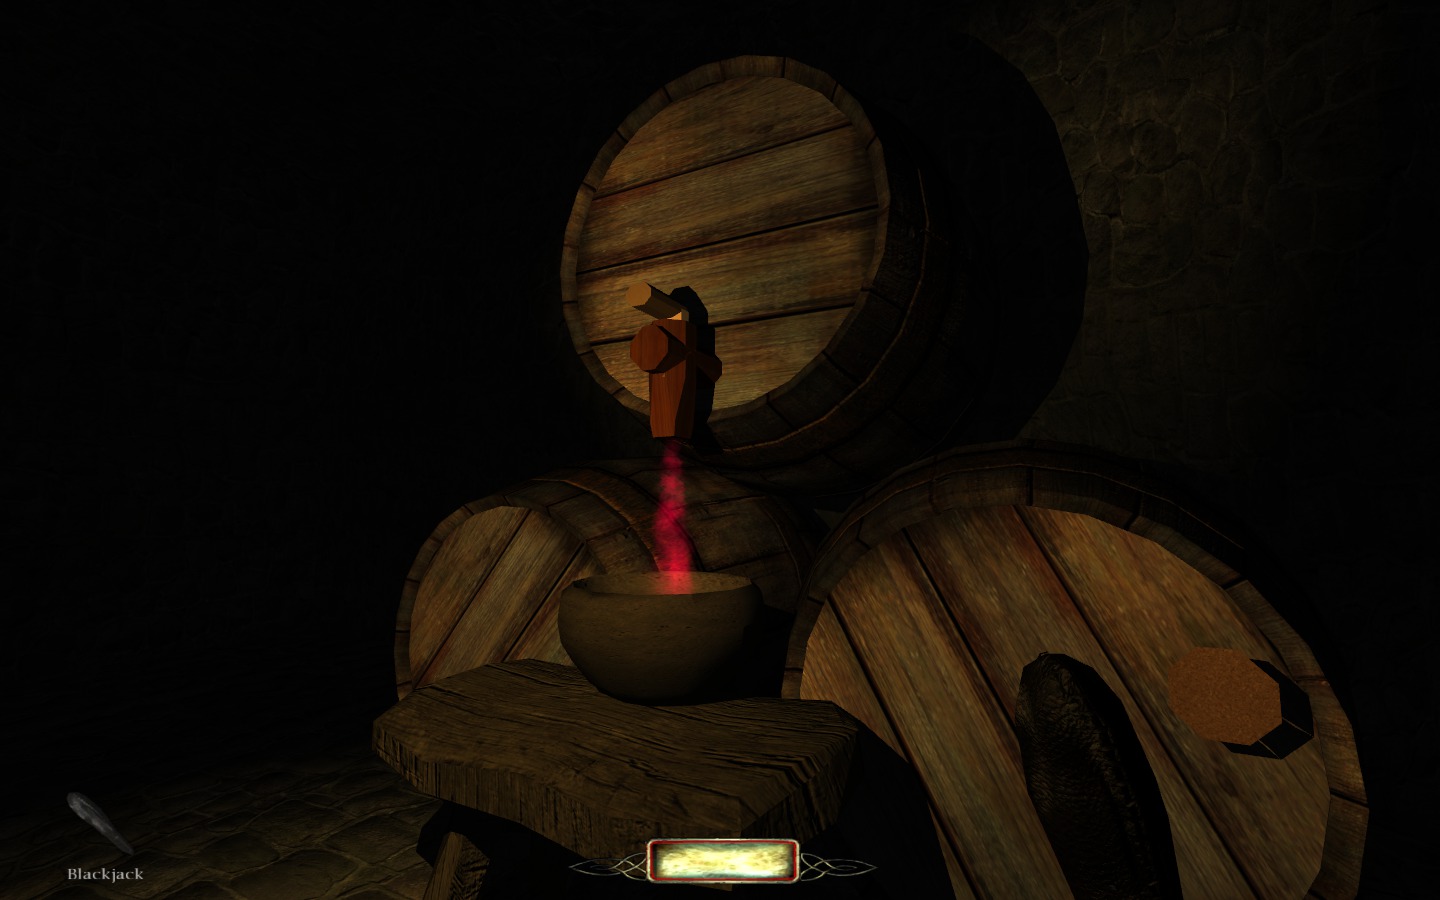
Oh I know very well how wine flows from a cask/bottle, and ale and many other delicious liquids It's not how I want it, but it is getting closer. Right now the particles spread and drift too far. I want them to stay in a cylinder and close together. I also can't (yet) control the brightness of the particle stream. Even if I assign it a color of deep Burgundy red, it ends up looking like glowing coolaid... even when it is in the dark. I had been hoping to do an effect like the filling tub in 'Heart', but on a smaller scale. However when I loaded Heart into DR to learn the secret, I think the water turned out to be a long patch stored vertically in the pipe above. I am still working with what is essentially a steam particle. I achieved what I did so far by blindly changing values in the patch file until it more or less started to behave more like I wanted. I saw a tutorial about this on a doom3 forum, but the author refers a lot to the 'editparticles' utility and to screenshots of it which don't exist anymore. I was going to play around more with it today (er... yesterday) but instead I got to playing with a big steam piston for the lift going to the wine cellar. I am very happy with that, considering my limited experience with DR.
-
Well, it seems that it did nothing but build a couple of ~40MB executables. After renaming the game01.pk4 files in both the base and d3xp directories, I put the newly built game01.pk4 files in place. I launched both Doom3 and TDM but did not playtest. I was hoping the SDK included the edit commands to open the editors in GTK windows. But nope... no edit commands at all. Why then are the sdk build 'gamex86.so files 37MB larger than the original ones. What do they include that we can actually make use of?
-
I managed to get the doom3 sdk built. It needed g++-3.3 installed (and symlinked from g++-3.3.6) and a line commented out in the SConstruct file. It then built without issue using: scons CXX="g++-3.3" I have not tried anything with it yet, but am about to see if the edit commands will be available. If so, I'll post the .pk4
-
I got basically what I need. I finally tracked down the particle I was using in the Doom3 pak000.pk4 file. I extracted it, renamed it and renamed the particles described in it and put it in its own .pk4 I then started experimenting with editing the .prt and nearly got what I want by trial and error. I'll have to read up on the sdk particle editor to see what all of the values relate to. I had some trouble with it drawing properly unless I left it in the doom3/base directory. It looks I'll have to extract related textures and pack them up too before I can move it to my map directory. The damn thing is bright though. I can see it glowing in the dark when it is out of range of my lantern. Looks florescent. Anyhoo... I took a couple screenshots of it nearly working as I want.

-
Yeah.. the console is not case sensitive. But what I'm saying is that the 'editAnything' commands do not exist for me. They must require the Doom3 SDK, which I don't have. I tried to compile it, but it is 5 years old now and will not compile on my system. I think the Windows version of Doom3 has the SDK already... probably why you guys have the edit commands and I don't.
-
From the Doom3 console, I found no such commands as 'EditParticles' or 'partEd' or anything even close. Pressing 'ed' followed by TAB came up with no commands even starting with 'edit' and pressing 'pa' followed by TAB came up with 'parse' 'password' and 'path' I think... nothing starting with 'part'. A google search took me to a page that says the command is indeed 'editParticles', but alas, no such command found when I try it.
-
Hmmm, that scrolling texture for making a drip seems like a good idea, pehaps I could apply something similar to a brush sized about 2x2x40 to reach from the tap to the bottom of the bowl beneath it (maybe I'll put a floor drain there instead of the bowl to help explain where the liquid goes).
-
Thanks guys. I'll try the text editor method. I'll probably use 'mc2_smallpipesteam_colorable.prt' and try to slow down the speed and narrow the spread so it looks more like liquid than steam. What I am doing may seem silly at this point for a DR newb like myself to be doing... but I'm doing it anyway. I made a tap for a barrel with a handle on top which rotates -90 degrees and triggers the particle emitter. It works well, except that I need to get that particle emitter under control so it looks more like a flow of liquid coming out of the tap instead of a pressurized spray. Edit: Here are 2 screenshots... which remind me that I need to cork those other 2 barrels
-
I suppose I knew that already, though I never tried using --prefix for my user's home path and doing make install as the regular user.
-
I'm looking for a particle emitter which is good for a small stream of liquid, such as from a faucet. Preferably one which can be colored. I have found several 'drips' which almost do what I want. A certain colorable steam emitter from Doom3 almost worked, but the spread and speed of the flow is too much. Doom3's 'dripping snot' was nearly perfect, but it ends up dripping in 2 opposite directions. Any suggestions?
-
Nice. That would make it a lot easier to deal with than installing it under /usr. At least once a year I do a full clean system install, usually with each major release of Mandrake. As such I format / and /usr when that happens. This will make (pun intended) for one less program to reinstall after doing so. I prefer make to copy the files for installation so everything gets where it needs to go. I could manually copy everything to a directory in /home/me after running make, but I hate sorting through the source to get the files I really need.
-
Drooool! That looks awesome with the marble texture!
-
(removed due to new post)
-
Thanks. I'm starting to get a bit more comfortable using DR. When I first installed it I opened someone's finished FM map and I was so lost that it boggled my mind. I'll try targeting the smoke from the torch. I really want to use that smoke emitter, which is from doom3, because it goes along well with the carbon scorch decal (also from doom3) which I put above the torch.
-
Here's a little video of my newbie map, loosely based on Fidcal's tutorial, which I have not yet completed. I got the key bind to the AI working, also smoke and scorch decals above one of the torches. I have yet to learn how to turn the smoke emitter off when the torch gets extinguished... maybe later tonight. my little Tutorial map video
-
Thanks. Ok I'll try the bind method again. But I did have a problem of the key showing when doing that. I was using Thug1 for the AI. I first placed the key so that the inner edge of the key was just touching the outer edge of the belt. Then I kept moving the key farther out from the belt. When using bindToJoint LeftHips_dummy, the key kept barely showing up no matter how I placed it. If I removed bindToJoint then the key would show where I put it, but it would tend to kind of bounce around as the AI walked. I'll try again. Perhaps I missed something. Edit: Got it! LOL, I really had to move the key farther out from the belt than I expected. When I was trying that before, moving it seemed to make no difference. Now it is perfect.
-

Animation Question -- how to start in different pose
PranQster replied to Springheel's topic in TDM Editors Guild
Did you check out the property "animate_z"... "disables gravity on character until he wakes up. used for on_activate anims where the bounding box needs to move up and down." I'm not sure if that would help, but it sounds like it will allow the AI to be levitated until triggered. The dropping-down should be automatic when triggered, then ?? But I really do not know, I'm a newb. -
I must admit, Fidcal, that I had been relying too much on the tutorial (Thank You for that tutorial, btw!!), which I had bookmarked, and forgot to check the Wiki pages for more answers. However, it seems that some of the wiki pages, at least regarding attaching objects to AI, need some updating. They refer to entity names for some of the keys which seem to have changed or been removed. For instance, "atdm:prop_silverkey" is not found, but "atdm:key_ornate_silver" is the only key with silver in its name. A similar situation for "atdm:prop_goldkey". It isn't too difficult to find these changes and adjust to them, but it's still a bit confusing for beginners.
-
Thanks Fidcal. That helps. I did get AI to unlock the door by re-doing my key from to 'bind' method to the 'def_attach#' method which I saw described by Serpentine in another post. But I will now add your suggestions. The 'bind' method combined with 'bindToJoint' made the key barely visible under the AI's belt and tunic, and the AI had trouble opening the door. Newest problem... I added these properties to the AI: 'def_attach6' 'atdm:key_fancy02' 'pos_attach6' 'belt_back_right' 'name_attach6' 'key_thug1' 'set inv_name on key_thug1' 'Front Door Key' 'set name on key_thug1' 'Key_thug01' That got the AI to carry the key on his belt and able to open the locked door. However, the key was positioned horizontally along the back of the belt. I tried modifying the values of 'attach_pos_angles_beltbr', but they were inherited properties and my changes did not save. I then created a new 'attach_pos_angles_beltbr', to no avail. I then tried this: 'attach_pos_name_beltbr' 'belt_back_right' Lo and behold! I could change the values of my new 'attach_pos_angles_beltbr' and the key would rotate. Unfortunately, the key would only rotate along its central axis or along a perpendicular axis which made it stick straight out of the AI's back. Nothing I changed for 'attach_pos_angles_beltbr' would rotate the key along the axis needed to make it vertical.
-
I've been going through the turtorial and I got to the part of attaching objects, ie. keys, to an AI. No problems there, The AI walks around with the key and I can pickpocket it and use it on the door mover I've assigned it to. Since I have 2 keys (one on his belt and another hanging on a nail), I have both 'used_by' 'Key_door01' and 'used_by_2' 'Key_copy_door01', and both keys can unlock the door mover. Where I need help is getting the AI to be able to unlock the door (while he still has the key). When the AI is in posession of the key, how can he be made to unlock the door? Edit: I did try assigning 'used_by_3' to the name of the AI itself, but alas, he is not a key
-
Yeah, it was those that made me search through the whole list of models before deciding to make my own with brushes Anyway, I did it last night with .25 brush size and it worked well and the nails look fine. Next will be to bend a couple of them but I have a more pressing issue which I will post about after this.