Search the Community
Searched results for '/tags/forums/modular building/' or tags 'forums/modular building/q=/tags/forums/modular building/&'.
-
Is there something wrong with the forums lately, or is it my browser? I've been having trouble formatting posts, and just now I couldn't format anything at all.
I'm using Vivaldi.
Usually I have to: select text, click bold, nothing happens, select again, click bold, then it works.
Same for other stuff, like creating spoilers, bullet points, links. Nothing works the first time.
-

I have no problem. I use Firefox. @Zerg Rush also uses Vivaldi. Have you tried without extensions, or in another browser?
(btw. bold, italic and underline have shortcut keys: Ctrl B, Ctrl I and Ctrl U, you could try that)
-
-
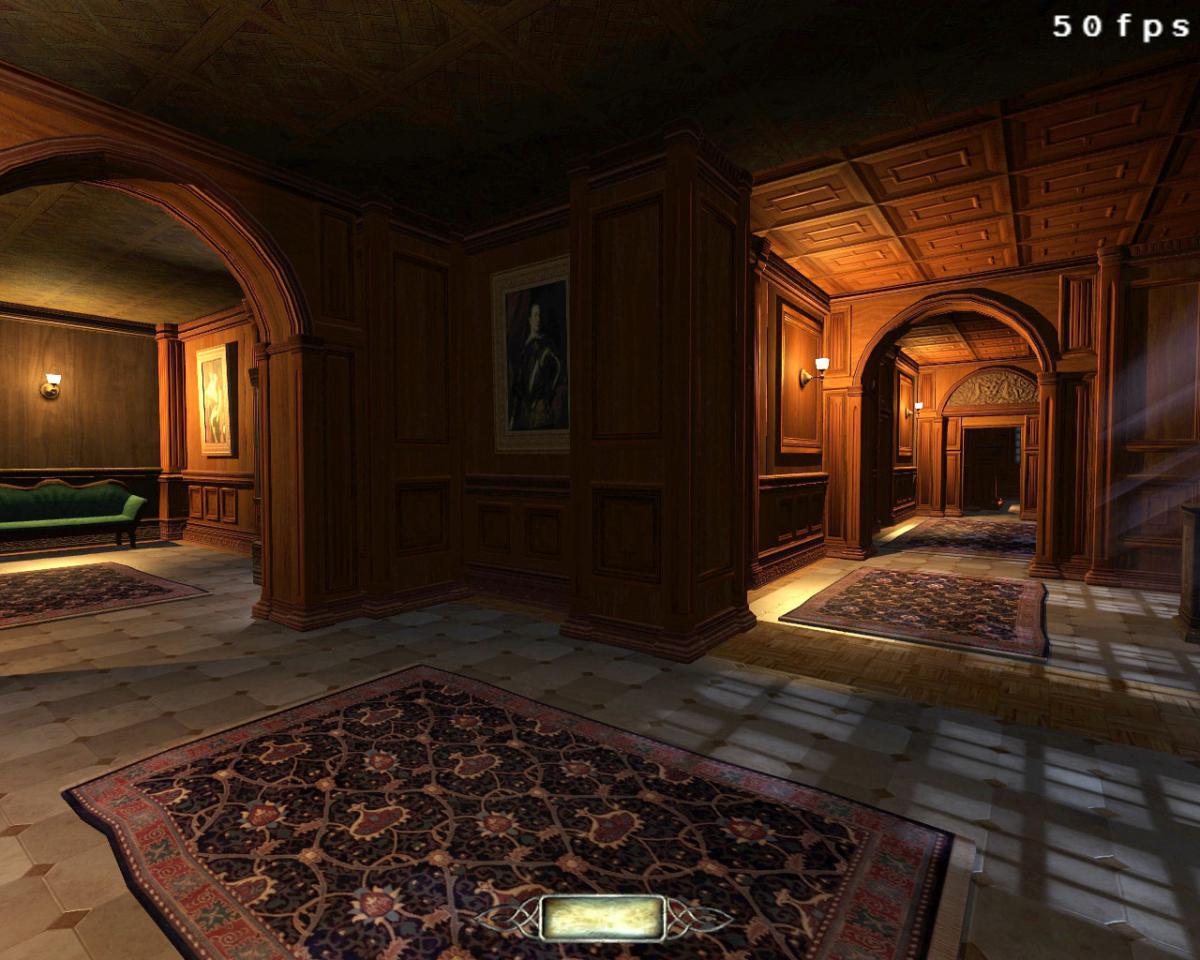
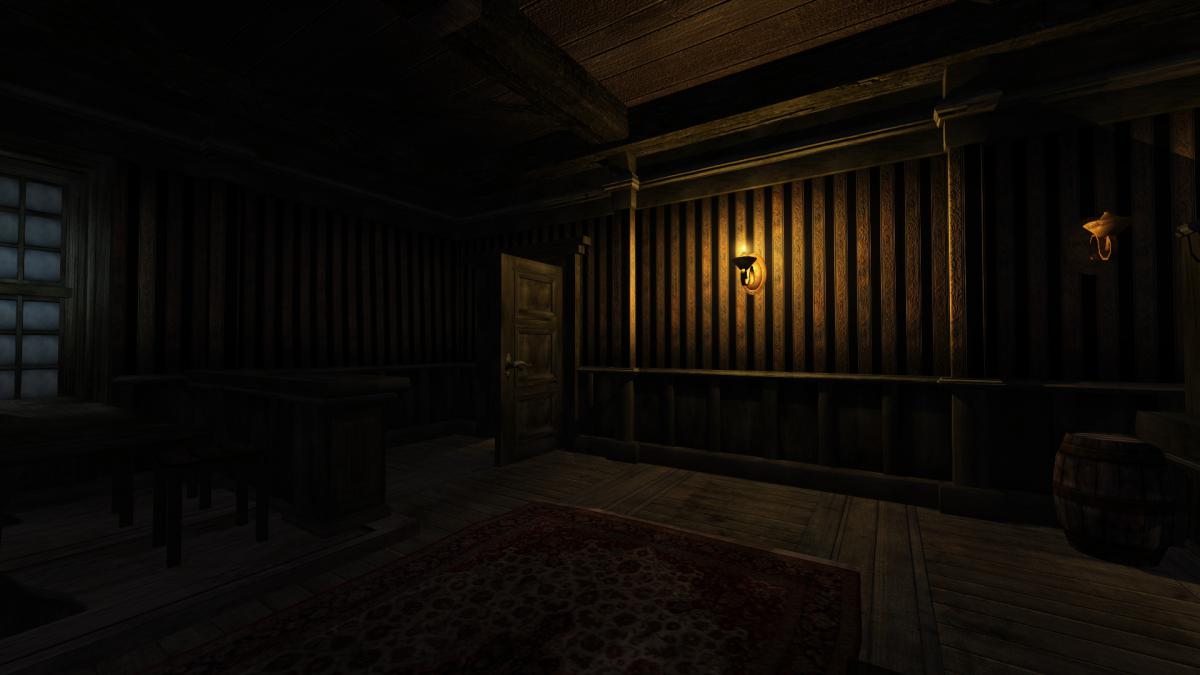
Obsttorte was interested in what I learned while making the LQD with the modular building technique, so I'll write some words about it here. What is modular building? It is about reusing every piece you build. In the old building technique you make things by hand. Then you move elsewhere and make things by hand. Every time you start from scratch and do a lot of work until you have a small area that looks good. In Modular Building Technique (MBT), you make parts you need by hand, make them into .ase models and then clone them. You spend a lot of effort to make a single pretty detail piece. Once it is done, you can easily clone it. Also you can easily make derivatives of the existing piece. Ie. first make a wall. Then use the wall and make it into a 90 degree corner. And a wall with a doorway. And a T-junction. And a Wall with niche etc etc. Every piece you make, you create with the intent of making it reuseable. It takes a bit longer to make a single piece, but once you have a library of pieces, you can create good-looking rooms in few moments, just by cloning and bashing the modules in place. Some history I first thought about large scale modules, whole rooms and corridor pieces. The module would contain everything: worldspawn walls (the sealing geometry) and the details. In LQD the first floor was built with this principle. The corridors were repeatably cloned: straight corridor module, straight corridor module, straight corridor module, 90 degree corridor module, straight corridor module, T-junction module and so forth. When I reached the 2nd floor in LQD I started build smaller modules. Straight wall model piece, 90 degree wall model piece... Like seen in the LQ's study and this tutorial, for example. I personally feel this small module approach was far better than the large module one. The reason is you get more from the pieces: build sealing geometry, then clone the models in. Or the other way around if you prefer. Cloning entire rooms (mixture of worldspawn and models) is a bit clunky and error-prone. It is easier to make the location from several small reusable model pieces and then draw the sealing geometry around it. How to build modular? 1) Decide a grid size. This is THE MOST important phase. Try out different scales and decide what size factor your map will be. In LDQ I decided that the grid will be 144x144. It felt right for a castle. 2) Design the pieces so that they fit together and in to the grid. Here is a single example, which shows how the module pieces fit with the grid. Remember to leave room for sealing world geometry! That is, the worldspawn walls and floors marked in the screenshots below: The above example is in 2d. I mean the module pieces touch in XY plane. If you design your pieces properly, you can also make them fit in the vertical dimension too. That means you can mix and match pieces you build to have more variety: wall type A, ceiling type B and so forth. See below how the ceiling module fits on top of the wall modules. Pay special attention to the texture alingment. Remember, that the textures cannot be shifted anymore in an ase-module piece. Thus the texture alignment must fit nicely when the module is designed. 3) Build! Once you have the pieces ready, all you need to do is clone them and create the room. You might want to make the pieces into ase-models for lower memory impact (a model is loaded only once, cloning func_statics will eat more memory) and to protect your func_statics from DR corruption bug. 4) Decal modules! You can also make decal modules. When I built the wall modules seen in the screenshots above, I also retextured them with dirt decals and saved them into ase models too. This means I can simply clone a decal module on top of the actual module, thus griming it up with a single cloning. See screenshot below, actual module and it's decal counterpart. This simplifies griming things up a lot! You can also make modules for various other things, like wall damage, windows, vaults and the like. When you need a piece, you build it, make it into a module and place it. Then when you need a similar piece later, you just clone and place. No point in doing wall damage by hand, as you can just quickly clone a piece you made earlier and paste it all around the place: 5) Skins! Note also that this is not the limit. By writing a skin file, you could have variation within the modules, like the wall paper in the screenshot below: Summary All in all, you spend a lot of time designing the pieces. I would recommend building the pieces in a separate modules.map. This way you have a factory: you build pieces there, it is quick to dmap and jump in-game to inspect you work. Once you are sure your piece is perfect, you make it into an .ase model. Then open your map and mash the pieces you have together quickly and minimal effort to create a good looking location. Keep on mapping with the pieces until you need a new one. Then go back to you module factory and build a new piece. Make sure it is perfect, make it into a model and continue. Look at the wall in the above screenshot. Building that by hand via the traditional way would take a while. In the modular way, once you have built a single unit of that 3 unit wall, you can built the whole wall in seconds. Or any wall of any lenght! That is the power of the modular approach. Good looking details with low amount of work. Downside is that you are locked to a grid and you need to spend a lot of time with the modules initially. Also you need to have the discipline to plan your map a bit so that you won't waste time building modules you don't want or need. Special considerations: Note the part where the different modules touch each other. Pay special attention to this spot. You have to be very careful how you align your textures. There should not be a seam there. You could avoid the seam making the texture 'mirror' between the touching module brushes. This is very critical part in your module design so pay attention to it. Larger modules can be good too. For example, the spiral staircase towers (there are two in LQD) were a single module containing all the worldspawn and func_static walls. I made one tower and then just cloned it and placed it into the other location. Two towers at the expense of one. If I'm gonna map in the future, I'll just grab the tower from LQD and retexture. Assuming the next map uses same grid, that is... And one more benefit. Sticking to the grid makes later adjustments really easy. In LQD, there is the bedroom that was converted to a storeroom next to LQ's study. Initially this room was just sitting in the end of the corridor and there was no access from the spiral staircase tower into it. When I was drawing the in-game maps I felt that there should be an third option for accessing the second floor. Then I just added a corridor module between the store room and the staircase. Changed the wall modules into doorway wall module and the connection was ready. Hopefully this helps other mappers to explore alternative mapping techniques.
-
 Please help to build the game from source in linux distribution (Nixos).
 -
I'm trying to compile TDM from source, to explore the engine for total conversion projects. But my hardware is a bit old, and the versions 2.08+ run into this black-menu issue (my gfx card is an ATI Radeon HD 4870, and the proposed solutions don't work), so I have to stick with older versions. So I tried compiling version 2.07, but it failed to compile. I'm not experienced with Visual Studio, so I'm not sure what to do. I get errors like this one: I tried right-clicking the solution and selecting "retarget solution", but it didn't fix it. I'm still getting the same errors. I'm not sure how to install the build tools says it requires. I'm on Windows 7 (x64), using VS 2017, so I'm not even sure I could use these build tools. Version 2.10 compiles fine, though, but I don't suppose there's something in the code I could easily switch off to make it run on my hardware.
-
Since Aluminum directed me here ( https://forums.thedarkmod.com/index.php?/topic/9082-newbie-darkradiant-questions/page/437/#comment-475263 ) can we have unlimited renderer effects? Well, maybe not unlimited, by maybe 3-5? Thanks.
- Show previous comments 1 more
-

Since I wasn't the one mainly asking, I'll just cite you in the original thread instead.
-

There already is a kind of sorting, sort nearest, sort decal, sort <n>. For things like windows and such, sort nearest should probably have the desirable affect, though looking through multiple translucent shaders might kill performance.
-
Is having multiple render effects really killing performance that badly? I don't understand. You're saying that if I have two transparent objects side-by-side, then they'll just count as two render effects, but when combined, they somehow become something much more difficult to render?
Never-the-less, unless we're talking some kind of infinite portal problem, why not let the mapper choose how much he wants to kill performance? Just warn him against putting too many effects close together.
-
Woo!! 2.10 Beta "Release Candidate" ( 210-07 ) is out:
https://forums.thedarkmod.com/index.php?/topic/21198-beta-testing-210/
It wont be long now
") ...
...
-
-
 2
2
-
 1
1
-
- Report
-
I don't think there's a link to thedarkmod.com on forums.thedarkmod.com ...
-
Yeah and the wiki and moddb. It should have those links in the footer I think. Probably easy to add by an admin.
Edit: And a link to the bugtracker. I'm always searching for a post in the forum that links to that because I can't remember the url.
-

I drew attention to this several times in the last few years. No one payed it any attention, so I just gave up.
-
-
1
-
- Report
-

Reluctance to improve the forums is matched by reluctance to allow more people to work on it. Talk about trust and power.
-
-
1
-
- Report
-
-
edit: I've created a video series to showcase the new modules and give examples of how to use them: http://forums.thedarkmod.com/topic/18683-using-springheels-205-modules/ Hope you enjoy them! There might be a bit of a learning curve, but before you know it you'll be creating scenes like these:


- 58 replies
-
- 32
-
-
 It's occurred to me that it has been quite a long time since I released anything. Meanwhile I've started and abandoned three largeish, ambitious missions because I got stuck, or I made something that I just couldn't get looking good, or whatever, and just gave up on it. But not everything has to be a big, sprawling epic. There's lots of smaller missions that remain fun to play despite their modest size: Thief's Den 1, for example. Even Closemouthed Shadows is still enjoyable. So... I am going to challenge myself to create a small mission in under 24 hours. Maybe I'll fail, but why set yourself a challenge you're sure to achieve? Where is the ambition in that? Whatever happens, at the end I will have at least a few serviceable areas done and that's better than the pointless fussing I've been doing lately. MY RULES: From the moment I post this thread I have 24 hours real time to produce a mission from scratch, playable from briefing to finale Implement three difficulty levels Include a small tribute to Grayman Include at least one secret The 24 hour limit does not include beta testing, a title screen, or producing cool promotional screenshots. I just need a mission to show after 24 hours The level will feature zombies, which is no doubt how I will feel this time tomorrow. Good thing I had a nap this afternoon. Well, here I go. Wish me luck.
- 30 replies
-
- 12
-
-
So here's a neat trick I would really like to be able to take advantage of in my Venice map. Take a look at the first part of this video by SimCity, then if you want to learn how it's done, check the 2nd link, where the scientist who invented the idea explains how to do it, and links you to his paper on the top to show you how to do it. [forgot how to embed video in here lmao] hint please https://youtu.be/_x88tvkAGuo?t=64 https://80.lv/articles/interior-mapping-rendering-real-rooms-without-geometry/ Here is the PDF of his Scientific Paper he wrote explaining in detail how to do this. http://www.proun-game.com/Oogst3D/CODING/InteriorMapping/InteriorMapping.pdf
-
Hi there! Since modular meshes are a thing in TDM, and I already saw some general misconceptions in the forums on how to make them, I thought I should show you one of basic techniques to make proper modular meshes, especially if you want to release them for others to use. First off, if you're new to the concept, have some preliminary reading: https://docs.unrealengine.com/udk/Three/rsrc/Three/ModularLevelDesign/ModularLevelDesign.pdf The document is old, but the principles of modular design stay the same. It's always about building the game world as fast as possible, while trying to save on polygons, textures and resources in general, and making the environment look as unique as you can. These seem like polar opposites at first, but with creative use of modular meshes you will reach that middle ground. Now, I'm not going to discuss my modeling techniques in much detail, since that's whole other topic, but we will stick to some ground rules: 1. Your wireframe has to be clean. I know this is modeling 101, but you can never stress enough how important it is. Essentially, your low-poly model has to be made with polygons (squares or rectangles) which can be divided into triangles when you convert it to a mesh. So, any piece rectangular flat surface should be divisible into 2 triangles. That doesn't mean you can't have triangles in your model. You can, they just won't be divided further. This is very simple mesh with 3 rectangular surfaces, in other words, it has 3 polygons. And this is how it should look like after export to mesh and in your game editor. As you see, everything is fine, there are 6 triangles. Now, in TDM module library I often see something like this: This is not a clean wireframe. You're looking at 14 triangles instead of 6. That's 42 edges instead of 18. While it may not be game-breaking now, it's definitely a waste of triangles. If you're going to have a whole collection of meshes built this way, you may be wasting processing power and lowering the overall game performance. Engines using lightmaps would probably have shadowing problems with this kind of wireframe. And that's how we move to rule number two, which is: 2. Save polygons whenever you can. Get rid of the faces players will never see. Use geometry only to convey believable shape of a model. Use high -> low poly model workflow and texture baking process to imitate complicated geometry with diffuse and normal textures. You don't need a thousand-polygon wall module, if you can fake it with normalmap and little visual difference. This is not only helpful in terms of performance, but it saves a lot of time at the model UVW Unwrap stage (it's easier / faster with fewer polygons to deal with). It also can be a design decision: whether it's a distant / skybox art or closer to the player, etc., etc. Now the rule number three, which is probably the most important of them all: 3. The pivot has to be moved to a place that allows most flexible use of a model, in as many scenarios as possible, and with grid set to as high number as possible. While this is not obligatory for unique objects, decorations and clutter, architectural meshes have to be cloned, moved, rotated and snapped to grid, as fast as you can. Typically, this depends on mesh dimensions and pivot placement. Since this all may sound very technical and abstract, let's get down to proper example. For my mission, I needed a wooden wall panel, something in the Builder's cathedral aesthetics. While browsing through many references, I found something appealing to my taste, but way above my modeling skills: I was also taking screenshots of Dishonored. I liked the Overseers' HQ, and I wanted to have something similar in terms of modularity: Notice that you don't need any special columns for outward corners, or to break up panels that are next to each other. I thought that the easiest way to achieve something similar would be to have a horizontal tiling texture with sections. Since I'm using 2048 textures as a base, I knew that 128 x 256 units will be enough for a wall panel, and I'll be able to divide it properly later. I didn't want the low-poly mesh to be complex, so I thought all I need is an upper trim section, the main section with inset panels, and the ground trim section. Technically, I could probably use one trim section and overlapping UVs to save on texture space, but I thought that is a bit too far Besides, any dirt layer on that would have the same spots or scratches on both trims, and that might look weird. This was the initial basic outline of my low-poly mesh. I thought the trim parts will be 16 u high, to fit better with overall proportions. Besides, if I'd changed my mind and decided that it's better to scale the model down to 64 x 128 u, it would have looked good as well. Now, since my drawing skills are basically none, I decided to model parts and decoration that would end up as baked texture and normal. I started with the middle section. Since the panel would be 256 u long, it was easy to divide it into 8 sections, 32 u each. I added thin strips between each section to make things a bit more interesting. Notice that I cut the strip by half on each end to make it tile properly later. I made a few adjustments and started adding decoration for the insets: Since there aren't many Builder insignia concept artworks, I tried making something on my own. It's kind of too close to hammerite stuff, but I liked it enough to leave it that way. Now the trims. Actually, one trim for the ground that is reversed for the upper section: The final model wasn't even high poly, medium poly at best. You're looking at 5200 polygons. I unwrapped the initial low-poly mesh (well, a plane with 3 setions), so it was super easy to bake the medium poly mesh onto it. I was using only half of the 2048 texture space. I could crop the texture to 1024 x 2048 and reposition UVs, but I decided that later I'd make a column, or another variation of this panel, so this space would not go to waste. This was kind of crucial moment and time when fun began. First thing I did was to check the pivot. I aligned it with the plane, moved it to the left side, and placed it on the ground. This way the model would be much easier to manipulate, whether it's moving around, rotating, or snapping to brushes or other meshes. Then I had to determine the final shape of the mesh and its possible uses. I applied the baked AO as bitmap to see whether the texture tiles (it did), and decided to tilt trim sections a bit, so it reflects the shape of medium poly mesh a bit more. I knew that players wouldn't see the bottom part of the mesh, but I wasn't so sure about the upper part. I decided to make the upper finish and used the trim part of the texture for it. Then I built a few walls to see how the mesh would look placed against them. That was when I realized my mistake. The pivot was in line with the middle section now, so, when I snapped it to a wall, the middle section was z-fighting with a wall. Duh! I selected the polygon and moved it 1 unit to the front. When I made sure that I can safely snap the mesh to walls and its clones, I proceeded to divide it to parts. As you see, this is still 128 x 256 wall panel, it's not really flexible. We need different length variations. Since I divided the medium poly into 8 even sections, I could slice the low poly mesh into chunks. Since having 8 different parts isn't that useful in the long run, I decided to clone the mesh, cut off one panel, clone the result cut another panel, etc. This way I came up with panels that are 224, 192, 160, 128, 96, 64 and 32 units long, respectively: The question is: do you really need that many panel variations? Typically, no. Four should be more than enough. You can always have a panel going through a wall, where player will never see it, so you don't need to be that precise and have all the length variants. Still, there was one thing even more important: corner pieces. I cloned the two-inset (64-unit) version of the panel to cut it in half. Then I rotated the "right half" 90° to the left to see the result. It was far from satisfactory. I knew that I'd need to align the upper and lower trims to form the corner, but I completely forgot that moving the middle section 1 unit to the front (to avoid z-fighting with walls) would create half a unit gap in the corner. This is how it looked after I aligned the vertices: This is where I could go to making textures and testing meshes in the editor, but there's also a problem of having inward corners. Many developers don't even bother with these, there will be some z-fighting of the upper part, in the small corner where meshes intersect. Not a big deal, but you can have such corners if you want as well. I felt like I had complete package, so I made some preliminary textures and material, then I begun exporting all pieces in .ASE format. All in all, I managed to create 12 variants of one mesh to cover the whole variety of its uses. After a few iterations of _d, _s, and _n textures, I came up with something like this: Edit: after getting some feedback I reworked the trims to give them more depth and proper silhouette, so the final result looks like this: This also demonstrates how important it is to bounce your ideas off someone or to show your work for peer review. A fresh look and healthy criticism can have very positive impact on quality of your work. I hope you'll find this useful while designing your own modular parts, let me know if you have any questions.
-
Not so long ago I found what could make a pretty good profile picture and decided to try it out on these new forums. But I couldn't find a button anywhere that would let me change it. I asked on Discord and it seems Spooks also couldn't find anything anywhere. So I logged into an old alternative account and, lo and behold, that account has a button. This is on the first screen I get when I: 1) click on my account name in the top-right of the browser -> 2) click on 'profile'. Compared to my actual account: Are you also missing this button on your account? It'd be very much appreciated if that functionality could be restored to any of the affected accounts.
-
Hi, I need to know what the code is to use Spoiler Tags. I am using my tablet and I don't have the options to use anything, like spoiler tags, quote tags, text changes etc. Thanks
-
I really need to get something better than this craptop and now with that crappy job I got I might even be able to afford it in a few months maybe. Don't need any deals I can look for them myself just tell me what it is I need to buy, I know about mother boards, CPUs, graphic cards and RAMs because that's what everyone's talking about everywhere but what other components do I need to have full a working pc. Just give me a full list of things I need to buy and maybe a short description of their purpose. That's all I know, buying a bunch of hardwares and putting them together, anything else I need to know?
-
Still spreading the word about TDM on forums to new peops... Funny to see people say "Awesome, I loved playing Thief back in the day!"
- Show previous comments 2 more
-
Yes it was in a discussion where someone was saying how unhappy they are with the way game companies grant themselves permission to do whatever they like to your PC and personal info today. I pointed out that giving up games completely is an unnecessarily overkill solution when there are free games like TDM to play.
-

Honestly the mod/Indie genre is still really booming right now. And they aint got no reason to do shady invasive privacy bs.
-
What Epifire said. :-)
-
How old is everyone? Go vote in the Poll: http://forums.thedarkmod.com/topic/19946-how-old-are-you-anonymous-poll/
-
http://forums.thedarkmod.com/topic/19886-fm-marsh-of-rahena-beta-testing Anyone want to betatest a horror fm?
-

Will do tomorrow.
-
-
Manjaro Linux gcc 8.1.1+20180531-1 scons 3.0.1-1 m4 1.4.18-1 subversion 1.10.0-2 mesa 18.1.1-1 libxxf86vm 1.1.4-2 openal 1.18.2-2 libxext 1.3.3-2 scons BUILD="release" TARGET_ARCH="x64": idlib/math/Simd_SSE2.cpp: In member function ‘virtual void idSIMD_SSE2::NormalizeTangents(idDrawVert*, int)’: idlib/math/Simd_SSE2.cpp:897:70: error: non-constant condition for static assertion static_assert(OFFSETOF(idDrawVert, normal) + sizeof(vertex.normal) == OFFSETOF(idDrawVert, tangents), "Bad members offsets"); ^ idlib/math/Simd_SSE2.cpp:897:70: error: dereferencing a null pointer in ‘*0’ idlib/math/Simd_SSE2.cpp:897:70: error: dereferencing a null pointer in ‘*0’ idlib/math/Simd_SSE2.cpp:897:70: error: ‘((((long unsigned int)((int)((uintptr_t)(&0->idDrawVert::normal)))) + 12) == ((long unsigned int)((int)((uintptr_t)(&0->idDrawVert::tangents)))))’ is not a constant expression idlib/math/Simd_SSE2.cpp: In member function ‘virtual void idSIMD_SSE2::DeriveTangents(idPlane*, idDrawVert*, int, const int*, int)’: idlib/math/Simd_SSE2.cpp:1010:69: error: non-constant condition for static assertion static_assert(OFFSETOF(idDrawVert, normal) + sizeof(verts->normal) == OFFSETOF(idDrawVert, tangents), "Bad members offsets"); ^ idlib/math/Simd_SSE2.cpp:1010:69: error: dereferencing a null pointer in ‘*0’ idlib/math/Simd_SSE2.cpp:1010:69: error: dereferencing a null pointer in ‘*0’ idlib/math/Simd_SSE2.cpp:1010:69: error: ‘((((long unsigned int)((int)((uintptr_t)(&0->idDrawVert::normal)))) + 12) == ((long unsigned int)((int)((uintptr_t)(&0->idDrawVert::tangents)))))’ is not a constant expression scons: *** [build/scons_x64/release/core/idlib/math/Simd_SSE2.o] Error 1 scons: building terminated because of errors. ==> ERROR: A failure occurred in package(). Aborting...
-
Hi all. I've had a few goes at building (mainly streets) but after coming up with very basic and small sections, I find myself reluctant to go further in case I've made some fundamental design error that's going to make things very hard later on. E.g. I know that visportals are essential, and that we can seal outside areas using PortalSky brushes, but do I really understand them? With previous building attempts, I've used one huge set of PotalSky brushes to allow me to make brush changes without the hassle of inadvertently creating leaks, but it's occurred to me that I may then end up with architecture that makes it very hard to create more localised sealing and good visportals. For my current attempt I've tried to keep things tighter - sealing areas locally and making visportals rather than just thinking about adding them later. Adding a new street is more of a hassle because keep creating leaks, but I'd be interested to know if that's preferable, for a noob, to leaving it to the end when it may prove impossible. Please see this attachment for my very small set of streets: tut.txt I've be interested to know if it seems like I have the right idea with visportals and PoralSky brushes. To me the latter look a bit messy, but it might be the only way when there are buildings with multiple heights (and I'd like to add pointed rooftops eventually). I'd also be interested to know if the street layout looks okay to work with, e.g. do you see any problems with adding more detail, and interiors for some buildings?
-
Perhaps a silly question, but how do you do custom model importing into DR ? I've found loads of documentation on things like WIP model import/export for various 3D modelling software, or what formats models should be saved in, etc., etc. But I basically couldn't find anything on how to import a finished, working custom model into DR. Sharing custom models made by our members is awesome, but it's hardly of any use if one isn't even sure on how to import them into the level they're building. I couldn't find a thread or a wiki article that could answer this. So, any up-to-date advice on how to do this for the current version of DarkRadiant ? I'll take whatever good advice I can get, and rest assured, I'll also write down some documentation based on it. Just so the info could be shared with other newbs who are still learning the ropes in DR. On a final note: Yes, I mean custom models. Not prefabs or maps. I know how to import those, it's easy. And those are already part of the base game at this point. But custom models made by others, that's a whole other kettle of fish for me. I'd like to try something simple for a start, e.g. importing a custom chair, etc., just to test the model importing process. Thanks in advance for any and all advice, I appreciate it immensely.
-
Cauldron v2.0 is finally done! http://forums.thedarkmod.com/topic/19207-fan-mission-volta-ii-cauldron-of-the-gods-by-kingsal-113017-update-v20/
-
Hi guys, through the "cheats" topic I got the idea, that it would be quite useful, if there were tags for missions (the post was about removing the killing restriction in some missions to suit the prefered play style). I don't know how easy or difficult this is, but with them, it would be quite convenient to pick missions with playstyles, environment, etc one does want to use. This could also be expanded to other mission properties. I remember a discussion about climbable drains, handles on doors, that cannot be picked and other things the map author chooses for himself. That way these things would be clearer and as I said before, it is easier to choose missions with playstyles that suit oneself. What do think?