Search the Community
Showing results for '/tags/forums/petike the taffer/'.
-
I got lost multiple times. It was my fault, but I had to literally jump off the roof to find my way back. The Exorcist room was neat, even if the trigger works from the room next door. What I thought was going to happen when I finished the optional objective, is that all the enemies will be gone (since I thought they're kept there by the book) when nothing happened I was disappointed. Hoped to put things to rest, so to speak. The atmosphere was great, the coffin was a nice touch, I loved that. I really struggled with the Map quest, however. I searched the room top to bottom multiple times, so I guess the readable was correct =D I found it, eventually, but man it was such a curveball.
-
So, I'm in the Undead Hogwarts, and I have everything I need, but there's this... ..in front of it that I can't seem to touch. If there was a written clue somewhere, I have completely missed it. Please assist.
-
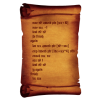
Builder Compound Pack will help you create better environments for your Builder-themed map sections! The aim of this experimental package is to provide high-quality models, materials, and other assets that don't put a big strain on the idtech4 engine. This early version is slightly more bare-bones than I wished for, as some modular sets (e.g. the roof) proved to be too complex and unfit for general use. Don't worry though, the set will be updated and expanded in future releases. Tweaks – Arch door and arch with hinges models have been removed. They were just static models, not actual door entities, and they weren't super useful, e.g. hey couldn't act as visportal closing entity due to gaps and transparent parts. – Detail texture stage added to selected materials (mostly those you can get very close to). As you approach a surface, you should see a slightly grainy layer that enhances the details. New content – Door01 and door01_frame have been added to both models and entities. This is a basic door for this corridor section. By default, it's locked (with easy lock) and AI will notice if it's left ajar. You may want to disable the latter (set ShouldBeClosed to 0) if you have a section with many AIs and doors, as it will probably disrupt AI patrolling too much. The frame will work with walls that are 16 units thick. Both door and the frame will work with grid of 8 and smaller. You can use the grid of 4 to change the door position within the frame. Look for grooves in the frame model. First of all, launch the map to see a simple section that was made with these assets. Use the menu or type map bc in the console to start the map. Noclip though the north wall, if you want to get to the staging area and see all pieces used to make this section. General info and tips: Make sure you have Rotate func_* entities around origin (Ctrl+R) enabled (Dark Radiant top icons) to use models efficiently. All models have custom pivot / origin point placement to make them snap to grid and geometry really fast. If you have keyboard shortcuts configured for RotateSelectionX/Y/Z and FloorSelection, placing these models around the map will be a breeze. I also recommend having shortcuts for SelectNudgeUp/Down/Left/Right, so you can move models in ortho views without using a mouse. DR detects models in a weird way, e.g. if your model is one-sided, or has some faces turned back to the camera in ortho view, selecting and moving it around will be difficult. Using keyboard is often more seamless and precise. You can select a model in perspective view, and then move it around in X/Y/Z plane using keyboard. Optimal scale for tileable materials is 0.125. This provides good pixel density vs repetition. Materials are optimized to be used both with and without post-processing, and the default gamma of 1.2. In some cases, specular hotspot might look slightly overblown with post-processing enabled. Correct look without post-processing was the first priority. Same principles apply to using lamp. The main idea behind this set is that you can use simple brushes for walls and floors, and wall panels have proper offset, so you don't need to use special surrounding BSP behind them. You can place panels right where your walls are, and there will be no z-fighting or clipping. Assumed basic measure for a corridor is 192 x 192 (length / width), but you can go lower if you don't plan to use arches and metal doors. The smallest wall panel piece is 24 units long. Use brushes to create basic space, then adjust it to what you can make with wall panels (combinations of 24, 48, 96, 192 etc.). DR's measurement tool is your friend. Default grid for placing most pieces is 8, but it goes down with smaller / more complex models and setups. One special case is matching metal doors to arch with hinges, this needs grid of 2. That's a mistake on my part. I didn't think of better pivot placement until it was too late. The example map contains a "staging area" where you'll find grouped arch, hinges, and doors, so you can use that as a template. As per The Dark Mod license, you may modify this pack's contents, although I'd advise against it. Most textures are compressed in lossy DDS format and compressing them again will result in loss of image quality. If you want to make changes, need alternative versions of a model or material contact me first. I'll see what I can do. Last but not least, I hope you'll find this pack useful and fun to work with, as I had plenty of fun while making it I already have a long list of models and features to include in subsequent releases, but I'm always open to feedback and suggestions. Thanks! Credits: Springheel, Obsttorte, Spooks, nbohr1more, STiFU, Destined and other TDM Forum members: guidance, encouragement, and fruitful discussions Epifire: asset feedback and critique The Black Arrow: inscription texts Plans for upcoming releases: Corridor: - Fixing the wall panel collision model, so strafing along it isn't wobbly Done. - Roof modular set Done. - Making metal door an entity with proper sounds and open/close times. Done, made proper door instead. - Floor switch model/entity for metal doors - Window set Done. Roadmap: All work is on hold for now. I'm working on a small FM that will use some of these assets plus many more. Some of existing assets will get reworked too. All links are taken down, and I have no release date yet, sorry.
- 73 replies
-
- 24
-

-
Walked through the mission. As everyone else here had some problems with the books puzzle. Also, opened the secret entrance to the laboratory through the wall, with the lever on the other side. Had to replay to open it with a prober books alignment. Otherwise, a very interesting short mission.
-
Well, the 7600 XT is considered sus for putting 16 GB on 128-bit, but it clearly works in some scenarios. Also IIRC GDDR7 will have about +30% bandwidth over GDDR6X right out of the gate, rising to about +100% as the generation progresses. Big caches (Infinity Cache L3 for AMD, lots of L2 for Nvidia) have made smaller bus widths more viable, and I think they have improved compression techniques and other factors over time to help alleviate bandwidth demands. There's already a little bit of analysis of what we can expect to see in RDNA3+ and RDNA4, very technical though: https://chipsandcheese.com/2024/02/04/amd-rdna-3-5s-llvm-changes/ I am eager to see if AMD is bold enough to do (or allow AIBs to put) 32 GB on the top RDNA4 card, which has long been rumored to be slower than the 7900 XTX in raster, but will hopefully beat it in raytracing and other areas such as AI/ML perf. And I think that card will have a 256-bit bus and 16 GB memory normally.
-
yeah its a jungle out there but a 12 gb card on a 128 bit bus would only be viable with dlss and then only just . but there will probably be plenty of options as you mention though id still go for something that would atleast be able to drag the ammount of vram without workarounds. strangely the old amd R9 390 had a 512 bit bus and could probably have accepted 32 gb vram but the card is to slow to do 4k in modern titles. even so the 8 gb model actually ran quite nicely in games such as the first horizon in 4K but would probably choke and die on forbidden west . minor wtf moment is crysis remastered it runs it at 4k in can it run crysis with a gazillion fps looks quite purty to but i suspect this is a bug.
-
Right now it cannot be done (the way I think you picture it) but mission details could be made available by the developers for modding ... In the meantime: Use AngelLoader (the one tool for all your mission management needs) Use the Unofficial Patch (or parts of) Raise your voice here Set the language to Italian (ah!) Build your own executable
-
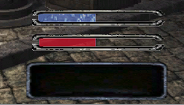
Hi! Basically, I made these changes purely for myself, but suddenly someone will be interested in playing with them in the same way. 1) Tweaked Lightgem Cleaner Design: I've streamlined the Lightgem by removing those small side details. After all, you already know if you're crouched, right? In-Game Look: Check out how it appears in your game: Editor View: Here's a peek from the editor for good measure: Easy Install: Drop the 'x_newlightgem.pk4' file into your game's root directory to install. To remove, simply delete the file. 2) Tweaked HUD Vibrant Upgrade: I've boosted the color intensity of your health and air bars for better visibility. Sharper Look: Redesigned the 'staples' along the edges, cleaned up textures, and added a touch more definition. Installation Note: Unfortunately, .pk4 files weren't playing nicely for this tweak. Simply unzip the included 'dds.rar' archive into your game's root directory. 3) Health\Air Bar Relocation Streamlined HUD: Health bar repositions for easier monitoring. Zero Fuss: No extra settings to mess with. Plays Nice: Works seamlessly with my other mods. How its look: Installation: Download the zzz_ui_settings.pk4 file. Place the file in the game's root directory. Uninstallation: Delete the zzz_ui_settings.pk4 file from the game's root directory. Let me know if you'd like any other tweaks! x_newlightgem.pk4 dds.rar zzz_ui_settings.pk4
-
EDIT - Please note this is Work In Progress and there are more versions available further down this thread ------------------------------------------------------- Hey, A post about a handheld lantern met my eye and sometime later @RedNoodles shared the source files. I don't know who created the lantern in the first place but as per the below post @Dragofer, @Amadeus and @Goldwell were involved. EDIT: @Obsttorte is to be credited BIG TIME, according to Amadeus: I have since been toying with the files and made further improvements: Term "Lantern" replaced with "Lamp" to distinguish it from the former. Comprehensive code clean-up. Removal of unnecessary files. Adjustments here and there. There still is room for more improvement: Better looking inventory icon Better sounds (it currently uses Blackjack sounds) Sounds improved thanks to @Goldwell The lamp clips through walls when up close (no idea how to fix this) The lamp still makes use of def/tdm_player_thief.def and script/tdm_user_addons.script and therefore it isn't compatible with all mission or other mods. I would like this lamp to be truly standalone and compatible with everything but I am not sure how to proceed from this point on. If you ask me, this neat lamp should be properly integrated in the game for mappers to make good use of it. You can find my version attached to this post. Place the *.pk4 in your TDM folder and access the lamp by scrolling through your weapons. Remember: the lamp isn't compatible with other mods. Cheers! z_handheld_lamp_v0.1.pk4
-

Allow broadhead arrows to break glass lamps
grodenglaive replied to MirceaKitsune's topic in The Dark Mod
Thanks. No scripts were harmed in the making of this. It's pretty simple to do because of the broken and brake spawn args. 1. It does distinguish, but I don't even know why It must be a property inherent in the glass material. 2. Good question, I'll have to get back to you. 3. I don't know how to use skins. OK, I tested it on a stock model. That doesn't work. If you use the same model for "broken", but just change the skin in the properties, it also applies the skin to the unbroken model (and vice versa). Oh, I just discovered you don't even need to put a stim/response on the arrow. It automatically breaks glass when you add the break and broken spawn arg on the object (you still need to make a broken model of course). Isn't that handy? -

Beta Testers Wanted. The Lieutenant 3: Foreign Affairs
Acolytesix replied to Frost_Salamander's topic in Fan Missions
I just need the download link -
Beta Testers Wanted. The Lieutenant 3: Foreign Affairs
Frost_Salamander replied to Frost_Salamander's topic in Fan Missions
You mean Discord? That's fine, you are more than welcome to use the forum if you want to help test -
Losing the option for stencil shadows would be extremely sad. TDM has the best stencil shadows implementation I've ever seen, and they look far better than shadow maps. They also perform wonderfully. Stencil shadows not supporting shadows on translucent surfaces is a bummer, but that's a fine tradeoff. Personally, I'd rather not see alpha-tested shadow occluders, because they look awful and are distracting. Shadow maps in general look bad and pixelated -- quite immersion breaking. Another issue with shadow maps is that they substantially increase the usage of the GPU. For those using laptops or integrated GPUs, it could cause performance or heat issues. For those with decent dedicated GPUs, increased wattage (and therefore heat) can and does turn on its GPU fans. The wattage on my AMD RX 6700 XT can become tripled when using shadow maps. That's undesirable. The advice I give players is: There really isn't a "best" shadows implementation these days. Some devs and players prefer one over the other. Regardless of which is chosen, stencil shadows and maps are used where needed. So, I'd try out both and pick the one you prefer. Here's Fen complaining about shadow maps. Complaint #1 (7:28): Complaint #2 (23:46): In his next video (Written in Stone - 4 - Chocolate Coated Brendel Bar), he turned on stencil shadows, and as far as I know, he never complained again. The following area in Written in Stone shows a good example of alpha-tested shadow occluders. Yes, technically the moving leaves cast shadows, but it looks awful in game, in my opinion. I know others like it. The same scene using stencil shadows looks amazing in game. (The screenshots don't do a good job demonstrating how it looks in game.) The current hybrid system is fantastic. It gives people choice. Those who prefer stencil shadows can use them; those who prefer shadow maps can use them. People become attached to the "art" and "style" of a mission, and changing the shadow implementation changes the art and style. If one must be dropped, I'd say shadow maps should be dropped from the menu settings. Use shadow maps for volumetric lights and stencil shadows everywhere else. And, I agree with nbohr1more that defaulting to rules consistent with stencil shadows is a good idea.
(3376.891125_6671.9)edited.thumb.jpg.42be40aa8e92e942cc37d1941eb75715.jpg)
-
Interesting idea. Not sure about my upcoming time availability to help. A couple of concerns here - - I assume the popup words uses the "Informative Texts" slot, e.g., where you might see "Acquired 80 in Jewels", so it likely wouldn't interfere with that or with already-higher subtitles. - There are indications that #str is becoming unviable in FMs; see my just-posted: https://forums.thedarkmod.com/index.php?/topic/22434-western-language-support-in-2024/
-
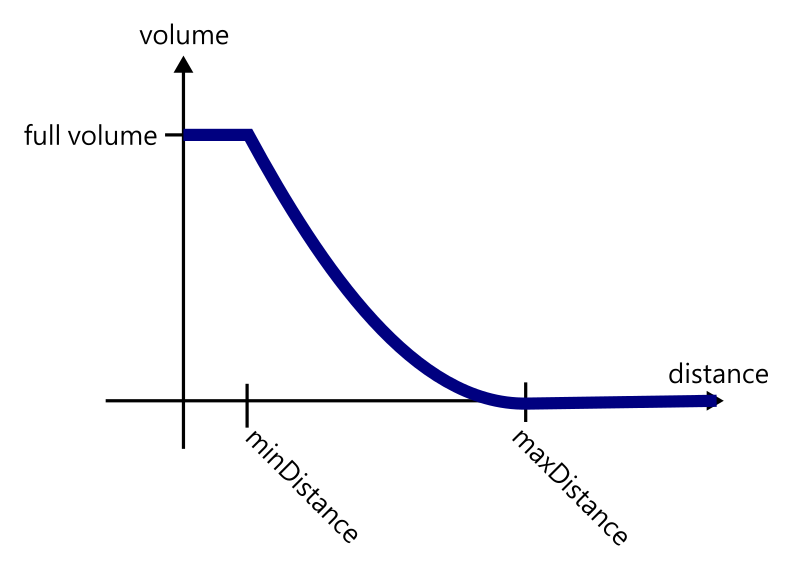
As far as I see in the code, minDistance/maxDistance specify the range in meters where volume falloff happens. Let's introduce F(d) as piecewise linear function. Then: F(0) = F(minDistance) = 1 F(maxDistance) = F(+infinity) = 0 F(d) changes linearly from minDistance to maxDistance The sound gain is multiplied by F(d)^2 (i.e. falloff is turned quadratic). If we talk about real physics, the falloff from point sound should linear without any caps. The gain should be multiplied by (1 / d). However, real sound sources are never perfectly concentrated at a point. If a sound source has size S, then the volume at distances up to O(S) will look like constant. I suppose default minDistance is nonzero to replicate this effect. The existence of maxDistance is harder to justify physically. Perhaps it is here for optimization reasons (don't process sounds farther than this). As for quadratic falloff instead of linear, I think the simply wanted the sound to fade away to zero smoothly.
-
Great little mission , what sets it apart from my point of view was the atmosphere, city design and the nice touch at the start of the mission. The only thing I miss (which I realize is a personal preference) is a bit of fog/mist in the city / garden, but other than that it was for me a near perfect mission albeit a bit limited. Played on 64bit Debian 'Trixie' with the 'darkmod' directory on NFS. (For some reason the first time i tried this mission darkmod failed to load the savegame. Only happened once, but still worth mentioning I think). Perhaps a bit off topic, but I wish the amazing city is being reused and made larger in another mission. Roaming the city (and it's roof tops) in another mission with a werewolf lurking around somewhere in the city would be a great second mission. Perhaps a second mission could be inspired by H.P. Lovecraft's 'the lurking fear' or 'the hound' if I may be so bold (and bald) as to say so.
-
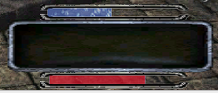
Sure! My first draft for a wiki article "Lightgem" would look like this: " [[File:Hud.jpg|right|thumb|The lightgem is shown as part of the [[The_Dark_Mod_Gameplay#HUD_(Heads-Up_Display)|HUD]]:<br/>2. A breath indicator when underwater<br/>3. The lightgem itself<br/>4. A health indicator.<br/>Two wings flank the lightgem indicating if the player is crouching.]] The '''lightgem''' is a light indigator on the [[The_Dark_Mod_Gameplay#HUD_(Heads-Up_Display)|HUD]] and an important part of [[The Dark Mod Gameplay]]. The lightgem itself indicates how visible the player is. The visibility is based on how much light is hitting the player, but also depends on whether you are crouched, moving, have a weapon drawn, or being under water. The wings on either side of the gem indicates when the player is crouching. Below the lightgem is a health indicator. When the player is injured, a small red bar appears below the lightgem. The bar shows how much health you have left and decreases from right to left. Health potions and various types of food will replenish health. The bar remains visible until the health is fully restored. Above the lightgem is a breath indicator. When the player is under water, a small blue bar appears above the lightgem. The bar shows how much air you have left and decreases from right to left. When the bar runs out, you'll begin to take damage. Surfacing or using a Breath Potion will restore your air bar. The lightgem is an object that the player always carries and is not visible in the [[inventory]]. A user can disable the lightgem and the wings in Settings - Gameplay - General - Hide Lightgem. The health indicator and breath indicator will remain visible. [[Category:Equipment]] " (With the caveat that I would need to use the preview-functionality to fix any formatting errors I may have made before publishing it.) I would also * link "BREATH INDICATOR", "LIGHTGEM", and "HEALTH INDICATOR" from "The_Dark_Mod_Gameplay#HUD_(Heads-Up_Display)" to the new article "Lightgem". * create "health indicator" redirecting to "lightgem" ("#redirect[[lightgem]]") * create "breath indicator" redirecting to "lightgem" I registered on The Dark Mod Bugtracker on 29 December and I have since reported 68 issues from a personal log of issues that I had assembled during hours of testing TDM 2.11. The reports are not perfect, but I think they show my intentions are good. I understand the reluctance, especially if there have been incidents of spammers on the wiki, but as an open source project relying on volunteer work it is also important to keep a low threshold for contributing to the product. If I'm not up to par, you'll discover it quickly. Or, rather, you would have already discovered it in the Bugtracker.
-
so some models have 128 bit and others 192 ??? though pretty much all reviews state the bus is only 128 bit wide so did nvidia up the ante in some later 12gb models to battle bad reviews . the table also seems weird as the ti models all have a 256 bit bus even the 3060 ti but there are no 12 gb 3060 ti models as far as i can see.
-
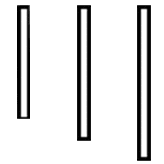
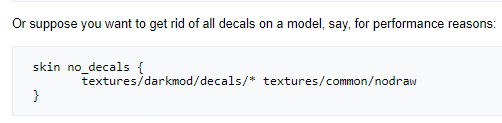
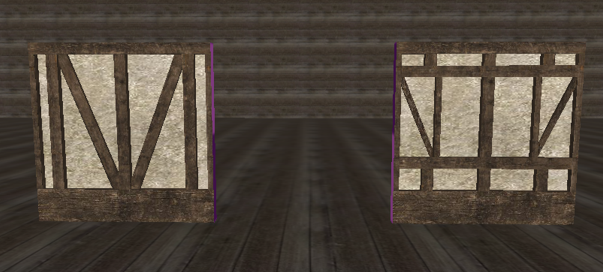
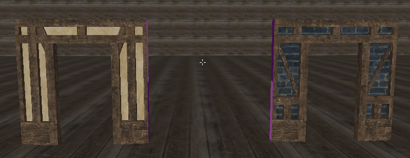
AHA, you're indeed correct! Changing the skin names so they start with "a1"' did the trick! This was actually a successful experiment I was trying out! The wiki goes into some detail about making "general skins" that can affect all models. My hope was that, if I made two models using the same skins, then I could just write a single skin file that would change all of them! For example, since "Straight Frame" and "V-Frame" models both use plaster_01 as their main background... ...all I have to do is make a general skin to change that specific plaster texture... ...and then any of the "V-Frame" and "Straight Frame" models can have different backgrounds! It's not a perfect system, as some skins just don't contrast well with the wooden beams, but I should still be able to get a LOT more out of my models now!

-
This might be frowned onto by tdm mappers/veterans, but I find it strange that it's considered ok to use text inside entities, which can then be found inside map files. That in general seems badly organised. Like for example with text decals: https://wiki.thedarkmod.com/index.php?title=Text_Decals_for_Signs_etc.#The_Decal Personally I think xdata could/should be used for all instances of text (except maybe darkmod.txt and subtitles), including readme files and GUI files. Or at least some kind of external text file. Could be something else, but the xdata format seems good and supported. So the sign text prefab could have a default xdata_contents spawnarg instead of gui_parm1 . Edit: Objective description text is also inside an entity inside the map file, but it could just as well be a reference to an xdata file. I posted about this before, here:
-
Done. @nbohr1moreWould you mind updating this on the server? Its a fairly bad bug, I've updated the OP but here is the link to the new pk4: https://www.dropbox.com/s/u279b60l40p29cq/moongate.pk4?dl=0 - I've fixed the issue with players getting places they shouldn't be. - Fixed an exploit with secrets - Fixed a few minor issues @snatcherIve included the stock tdm_playertools_flashbomb.def
-
 I've been meaning to suggest this for months, but the previous improvements have already made Layers so nice to work with that I just got lazy about this. But there's a few things I think could still be improved. And personally, I would prioritize the first one below, if I had to pick one. I haven't been following DR's development, so I don't know if any of this is already done and ready for the next release. But in case it's not, here goes. 1- it would be nice to be able to right-click a layer in the Layers panel, and have all the options to add to layer and move to layer and remove from layer, right there. This would make it much easier and quicker to manage layers. And, I personally keep adding prefixes to layer names, so that they're sorted in the list below, so I can find them easier, because the list gets big and confusing. This improvement would remove the need to do that. It would even remove the need for using this list, I think. 2- It would also be nice to add a new layer directly as child of another layer, just by right-clicking the intended parent layer. Currently, you have to click the New button at the bottom, and then manually drag the layer to its intended parent. Or when clicking New, the new layer could be created as child of the selected one. 3- I've suggested this one before, but I don't know if it's doable or not. It's harder to explain and I think the benefits aren't very obvious. It would be nice to override the visibility of objects that are contained in multiple layers, by toggling one of those layers on/off. So the layer you toggle, overrides their visibility. So regardless of whether its objects are visible or not, hiding this layer, would hide all of its objects, and vice versa. This can be useful when you have certain objects in their respective layers, but then you'd like to have also have a way to toggle all of them on/off at a single click. And with this improvement you could add them to a separate layer, and then just use that layer to override their visibility whenever you needed. For example, to get the ceilings of a whole bunch of rooms out of the way all at once, so you could have a clear view of the rooms while you put in furniture or path nodes or something. Currently, objects are always visible if any of the layers that contain them is visible, so this kind of thing can't be done. (And to be honest, because of that, currently it seems to me that there's no point having objects in multiple layers.) This is also useful for grouping things for easy group-selections. Arguably, you can also use selection sets for that, but the way you create and delete them makes them more suitable for quick and dirty one-time grouping, rather than something a little more indefinite. The two approaches have different levels of control, which makes them appropriate for different use cases.
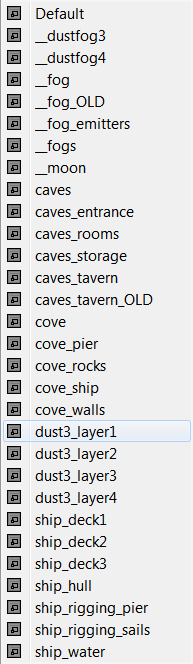
-
Should we consider using detail textures?
The Black Arrow replied to MirceaKitsune's topic in The Dark Mod
Wasn't "Megatextures" the reason Doom 2016 (IdTech 6) takes years to load though, even on a high-class SSD? I've then heard that Megatextures were scrapped out in Doom Eternal (IdTech 7), which apparently could add to the fact it loads incredibly fast. -
DR window layout wiki
Frost_Salamander replied to datiswous's topic in DarkRadiant Feedback and Development
Here's mine, also 3 monitors but I only use 2 for DR: single XY view on the first monitor; switch between XY views using CTRL-Tab Camera and all other tools on 2nd monitor - now that everything is a tab no need to tile everything 3rd monitor for other non-DR stuff (like the forum )
-
That is fair. I have reported 84 issues in the bugtracker (and contributed to some of the existing ones), proposed articles to the wiki (see above) to demonstrate that I am familiar with the format, and contributed some on the forum. In the event a wiki user does not contribute in a constructive way, it is easy to block them and revert their changes.


(3376.891125_6671.9)edited.jpg.d7e2832f69ccc0144210fd9e50b87e6f.jpg)